The Internet has become a part of everyone’s life. We can do a lot of tasks sitting anywhere using the computer system with the help of the Internet. We can make online transactions, can purchase anything online, can watch movies, and videos, and more.
To keep things secure, privacy is a serious concern for all PC users. If you are using a Mac, then today’s guide is all about securing a Mac using a VPN connection. If you are wondering about “how to share my VPN connection Mac”, then this guide will help you.
This tutorial can also be used even if you use any of these services
- 12VPN
- Adtelly
- AirVPN
- Anonine
- Anonymous VPN
- Atlas VPN
- Avast SecureLine VPN
- AVG Secure VPN
- Avira Phantom VPN
- Banana VPN
- BartVPN
- Betternet
- Bitdefender Premium VPN
- BolehVPN
- boxpn
- Bright VPN
- BTGuard
- Buffered VPN
- BullGuard VPN
- CactusVPN
- ClearVPN
- CyberGhost VPN
- EarthVPN
- Easy Hide IP
- me
- ExpressVPN
- F-Secure Freedome
- FastestVPN
- FrootVPN
- GhostPath
- GOOSE VPN
- GoTrusted
- HashtagVPN
- Hide My IP
- Hide.me
- HideIPVPN
- HMA VPN
- Hotspot Shield
- ibVPN
- me
- IPVanish
- IronSocket
- Ivacy
- iVPN
- Kepard
- Le VPN
- Leafy VPN
- Liberty Shield
- LiquidVPN
- Mullvad
- MyVPN
- NoodleVPN
- NordLayer
- NordVPN
- Norton Secure VPN
- Opera VPN
- OverPlay
- OVPN
- Panda VPN
- Perfect Privacy
- Perimeter 81
- PrimeVPN
- PrivadoVPN
- Private Internet Access
- Private WiFi
- PrivateVPN
- ProtonVPN
- proXPN
- sh
- com
- PureVPN
- RUSVPN
- SaferVPN
- SecureTunnel
- Shellfire VPN
- SiteLock VPN
- SlickVPN
- Speedify Review
- SpyOff
- StrongVPN
- SurfEasy
- Surfshark
- SwissVPN
- SwitchVPN
- tigerVPN
- TorGuard
- TorVPN
- Total VPN
- Zone
- TunnelBear
- UltraVPN
- eu
- VeePN
- VersaVPN
- VPN Traffic
- VPN Unlimited
- VPN.ac
- VPN.asia
- VPN.ht
- VPN4ALL
- VPNArea
- VPNGhost
- VPNhub
- VPNLand
- VPNSecure
- VPNTunnel
- VyprVPN
- Webroot WiFi Security
- WeVPN
- Windscribe
- WorldVPN
- ZenMate
- ZenVPN
- ZoogVPN
- ZPN
Contents
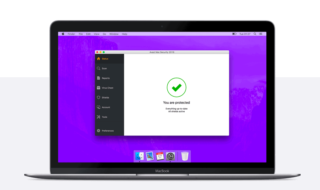
The best thing about the best VPN providers for Mac is they allow Mac users to share their VPN connection with other Mac systems or devices. One can secure multiple systems using a single VPN connection.
The process to Share a VPN connection on a Mac system is divided into two different parts- the configuration of the VPN and the Sharing of that configured VPN. Let’s discuss both parts in brief.
How to Configure VPN on a Mac?
The following steps will show you how you can configure VPN on a Mac system to set up an L2TP/ IPSec connection.
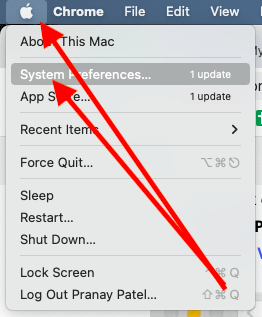
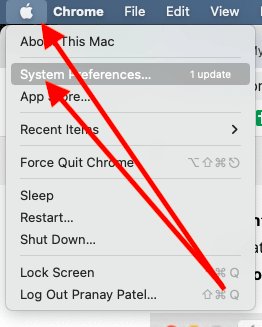
Turn on the Mac system, and click the Apple Logo located in the upper left corner. From the given menu, select the System Preferences option.
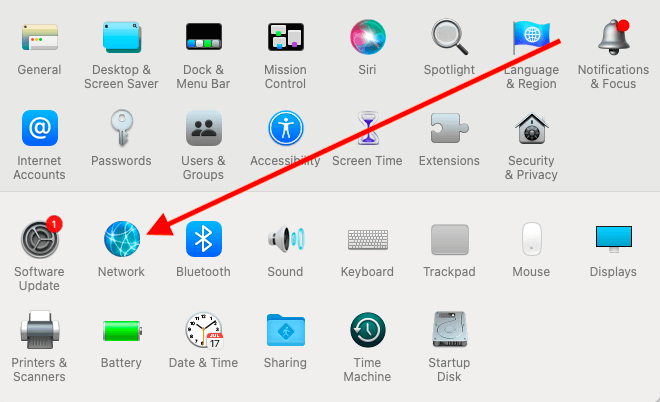
From this window, click on the Network option.
Now, click the “+” icon located at the lower left corner of the page.
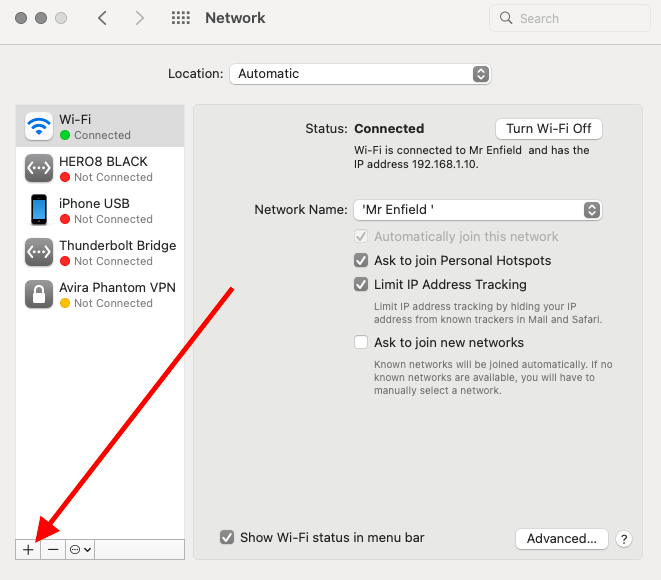
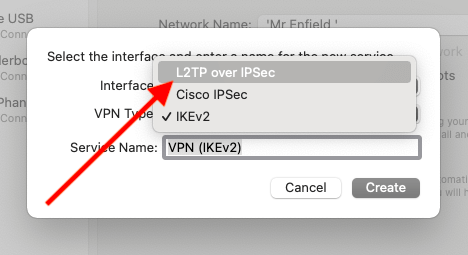
From the right window, select the interface’s dropdown and click the VPN option.
From the next option of VPN type, select the L2TP over the IPSec option.

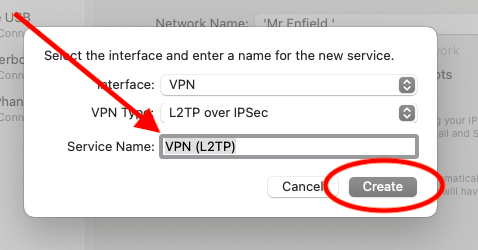
The Service Name should be VPN (L2TP), at last, select the Create option.
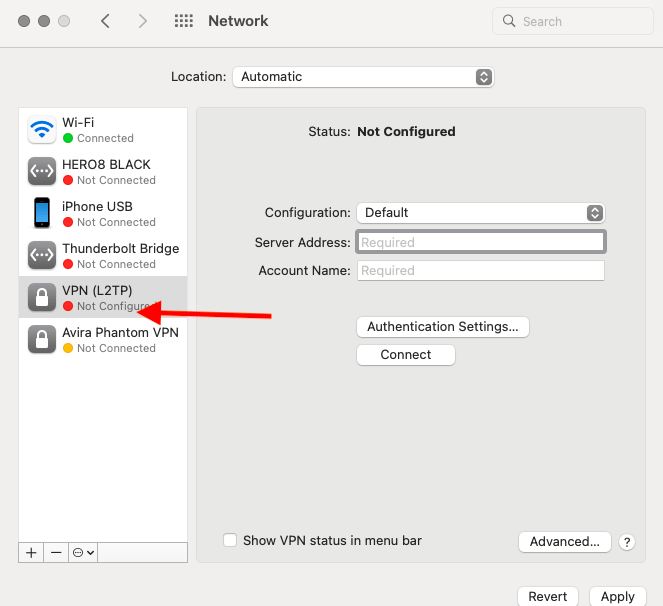
From the next window, select the VPN that was just created and then configure it by adding the Server Address, and account name of the VPN. And then Authenticate the settings by clicking on the Authentication Settings option.
From the User Authentication and Shared Secret options, enter the password of the VPN.
Now, click on the Advanced option and then select Send all traffic over a VPN connection.
Click Ok and select Show VPN status in the menu bar option.
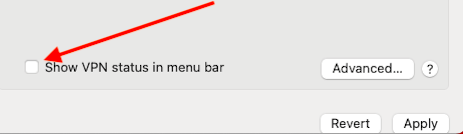
The VPN status bar should appear at the top right corner beside time. You can use it right from the status bar itself. Click Apply at last to save all the changes made by you.
This is how you can configure your Mac system for the VPN service that you want to share with others.
How to setup a VPN service for Sharing on Mac?
Once you have configured your VPN with the Mac system, the next thing you need to do is set up the service for sharing with other Mac systems and devices. The following steps will show you how you can set up a VPN service for Sharing on Mac.
Make sure that your VPN service is turned on. If not, click the Toggle button or the On button to enable the VPN service on your Mac system.
Now, click the Apple Logo located at the upper left corner and choose the System Preferences option.
From the opened window, click the Sharing option.
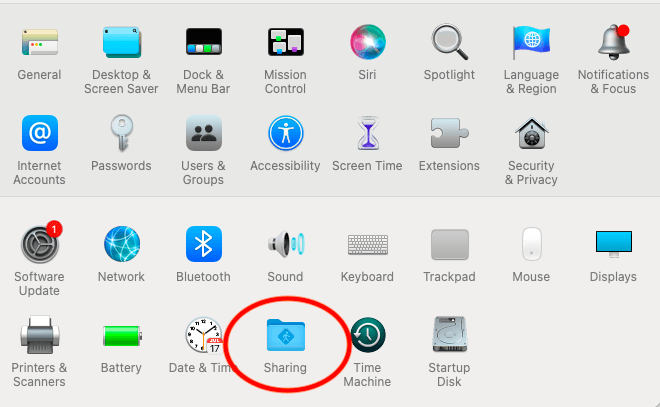
In the Sharing window, select the Internet Sharing option from the left sidebar.
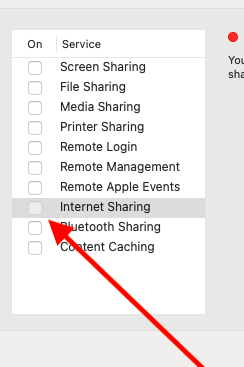
From the right window, select the VPN (L2TP) from the Share your connection and then choose the WiFi option from the To computers using. Click the WiFi options to configure your Wi-Fi network.
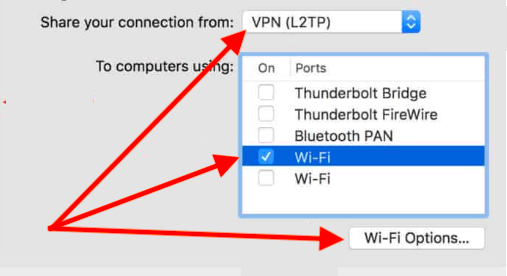
Once you select the WiFi options, you will be presented with a window asking for your WiFi information. Make sure to enter the correct details here to finish the setup process.
Click the Ok button and then tickmark the Internet Sharing option from the left sidebar.
That’s all you have to do to set up the system for sharing the VPN connection to other systems and devices. The process requires a bit of technical knowledge, however, after following the above-given steps wisely, anyone can easily configure and setup up the VPN for sharing on a Mac system.
Once done, the VPN service can be shared and used on any WiFi-enabled device. You can connect and use it over iPhone, Xbox, Playstation, Android devices, and other devices that you use with the WiFi network.
Furthermore, if you want to deactivate this service, simply go to the System Preferences window and select the Network option. Click the Disconnect button to deactivate the service for others. Once done, the Virtual Private Network sharing will be off for other devices and other devices will no longer be able to use your VPN service.