Taking photos on an iPhone is effortless. Before you know it, though, hundreds or even thousands of pictures can pile up on your device. Moving some of those photos to your PC gives you more room on your phone while also creating another copy of memories you don’t want to lose.
There are several ways to transfer your pictures. You can use a USB cable, Windows Photos, File Explorer, or a wireless solution. If you prefer automatic transfers without depending on traditional cloud storage, TonfotosSync can also help you move photos from your iPhone to your computer.

Below, we’ll look at the easiest ways to import photos to your PC from an iOS device.
#1 Import Photos Using the Windows Photos App
One of the simplest options is the built-in Photos app in Windows. You don’t need to manually search through folders on your iPhone, making this method useful if you’re transferring a large batch of pictures.
- Plug a USB cable into the port of your iPhone and the other end into your PC. Make sure the phone is unlocked while you are doing this. Tap on Trust if this is the first time you are connecting your phone to your PC.

- Open the Photos app on your PC and choose the option to import photos from a connected device. Select your device when drop options appear (in this case, it is Apple iPhone)

- Select the photos you want to transfer. You may be able to choose individual images or import everything at once. Select the destination folder and begin the import.
Keep your iPhone connected until the process finishes. Large photo libraries and videos can take a while to transfer.
#2 Transfer Photos with File Explorer
File Explorer gives you more direct control over where your pictures go.
- Connect and unlock your iPhone as before. Open File Explorer on your PC and look for your iPhone under This PC. Open the device and navigate to its internal storage.
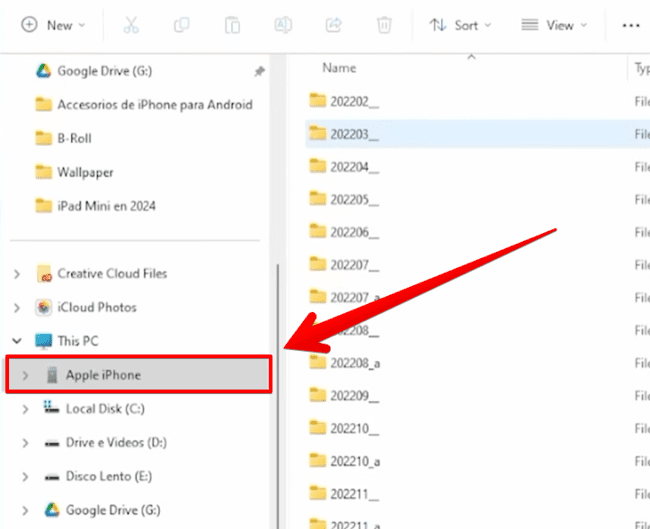
- Your photos are normally stored inside the DCIM folder. Depending on how many pictures you have, you may see several folders rather than one large collection.
- From here, select the photos you need and copy them to a folder on your PC. You can create folders for different years, trips, family events, or other categories.
This method is straightforward, but it can become tedious when you’re dealing with thousands of photos spread across several folders.
#3 Use iCloud Photos
If you already use iCloud Photos, you don’t necessarily need to connect your iPhone to your computer with a cable.
When iCloud Photos is enabled, pictures from your iPhone can sync with your iCloud photo library. You can then access them from your PC using iCloud for Windows or through iCloud in a web browser. Check your available storage before relying on this approach for an extensive photo collection.
#4 Transfer Photos Automatically
With an automatic setup, new photos can be copied from your iPhone to your computer periodically. This is especially helpful if you take pictures every day and want to maintain a separate photo archive on your PC.
Some solutions are designed to transfer pictures directly to your own computer rather than storing the library with a conventional cloud provider. This gives you greater control over where the files are kept.
Whichever method you choose, check that the transfer has completed successfully before deleting anything from your iPhone.
#5 Keep Your Photos Organized After Importing
Importing pictures is only half the job. A folder filled with thousands of files can quickly become difficult to navigate.
Consider creating a simple organization system. You could arrange folders by year and month, for example:
Photos > 2026 > July > Summer Vacation
You can also organize pictures around birthdays, holidays, trips, or family events. The exact system matters less than being consistent.
It’s also worth checking for duplicate pictures occasionally. Multiple imports can leave you with several copies of the same image, consuming unnecessary storage.
#6 Don’t Treat Importing as Your Only Backup
Copying photos from your iPhone to a PC is useful, but one copy on one computer shouldn’t be your entire backup strategy.
Hard drives can fail. Computers can be lost or damaged. Files can also be accidentally deleted.
Consider keeping another copy of important photos on an external drive, NAS, or another trusted backup location. Having photos stored in more than one place greatly reduces the chance of losing an entire collection because of a single problem.
Before removing pictures from your phone, open several transferred files on your PC and make sure both photos and videos work correctly.
Which Method Should You Choose?
The right method depends on how often you transfer photos and how much control you want.
Windows Photos is a convenient choice for occasional imports. File Explorer works well when you want direct control over folders and individual files. iCloud is useful if you prefer automatic synchronization across devices. A dedicated syncing solution can be more practical when you want regular transfers to your own computer.
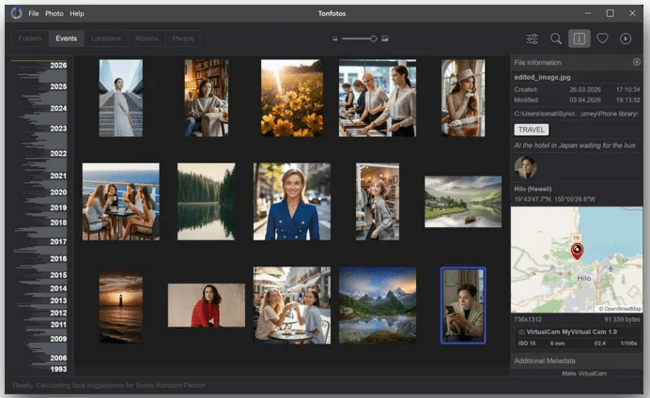
If you have a growing library, organization becomes just as important as transferring the files. Photo-management software such as Tonfotos can help you browse and organize a large collection once your iPhone pictures are stored on your computer.
Conclusion
Learning how to import photos from an iPhone to a PC doesn’t require complicated software. A USB cable and Windows’ built-in tools may be all you need for occasional transfers.
For people who take photos frequently, however, a more organized routine can save a lot of time. Choose a transfer method that fits how you use your devices, organize your files after importing them, and maintain an additional backup of important memories. Once you have a reliable system in place, your iPhone photo library becomes much easier to manage.