We all live in a busy technology world where most of our tasks are done online. When it comes to working online, multitasking plays a crucial role. It allows users to do multiple tasks at the same time. If you are working on a Mac system, you can enable this option which comes as a default one. How to enable & use stage manager on Mac?- explained here in detail!
As noted above, the stage manager is related to multitasking. You can jump onto an active app on a Mac system by enabling the stage manager tool. It is easy to enable and customize this tool as it is Apple’s default tool for those who look for a special tool to improve their productivity while working. Let’s collect some more information about this tool.
Contents
What is Apple’s Stage Manager?
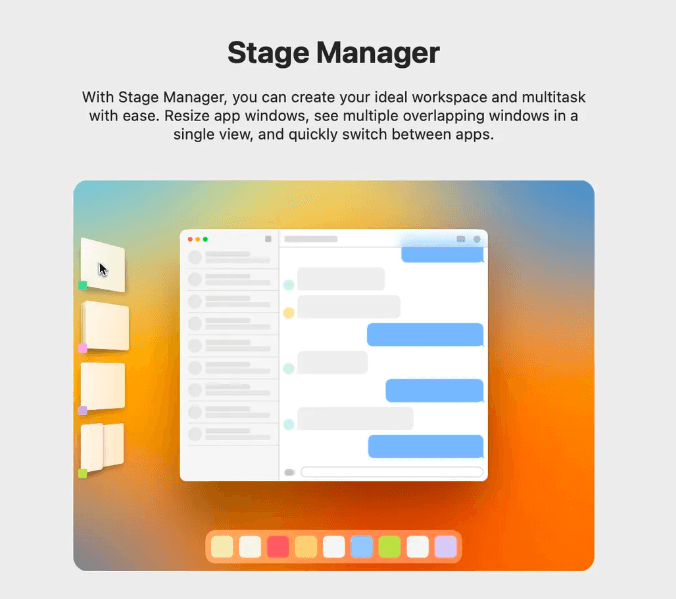
Apple has introduced this new multitasking feature called Stage Manager on iPads and Mac systems running on the latest macOS Ventura. Stage Manager is a multi-task manager designed to make your desktop look simpler and easier to use. It lets you organize your desktop better so that you can select and use the right app you want with just one click.
Stage Manager lets you view all the active apps on the desktop with the main app running on the front middle. You can quickly switch between the active apps without living the entire screen which makes this tool a much more welcoming one for multitaskers.
If you have just upgraded your Mac system to the latest macOS Ventura, then this guide will help you enable this super useful multitasking feature called Stage Manager. The following steps will show you how you can enable stage manager on a Mac system. Let’s jump on to the guidelines now!
How to Enable & Use Stage Manager on Mac?
The new macOS Ventura has upgraded the Control Centre options with the new Stage Manager tool. You can quickly enable or disable this feature by simply clicking on the Control Centre option. Let’s see how you can enable this feature on a Mac.
Steps to Enable Stage Manager on Mac
Step 1: Open Control Centre
Go to the upper right corner i.e. the main Apple Menu and click on the Control Centre icon. This should open up the Control Centre panel as a new Window on the right side of your Mac’s screen.
![]()
Step 2: Select Stage Manager
On the Control Centre panel, you would see the Stage Manager option. Click on that option to enable the Stage Manager feature on your Mac.
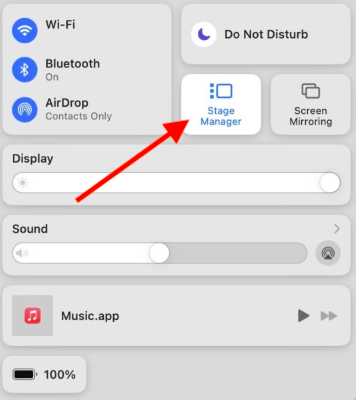
That’s all you have to do to enable the Stage Manager feature on a Mac system. The Stage Manager is now active on your Mac and you can use it for multitasking.
Now, you must be wondering about how to customize or how to use stage manager on Mac. The following steps will show you how you can customize this feature on your Mac system.
Steps to Use Stage Manager on Mac
As soon as you enable the Stage Manager feature on your Mac, you will see the recently used apps grouped at the sidebar of your screen. The other two apps will be on the front of the screen located side by side.

To use any of the apps or to add any new app to the stage manager, you can simply click and drag that app or window.
You’ll get a better experience once you start using this app. Enable this feature now and start using it.
Steps to Use Stage Manager on Mac
As soon as you enable the Stage Manager feature on your Mac, you will see the recently used apps grouped at the sidebar of your screen. The other two apps will be on the front of the screen located side by side.
To use any of the apps or to add any new app to the stage manager, you can simply click and drag that app or window.
You’ll get a better experience once you start using this app. Enable this feature now and start using it.
Steps to Customize Stage Manager on Mac
You can even change the appearance of the Stage Manager the way you want by simply customizing it as per your needs. You can also change its behavior right from the customizing window. Here’s how you can customize the stage manager on the Mac system.
Step 1: Open System Settings
Go to the Apple Menu and select the System Settings option.
Step 2: Search for Stage Manager
Click the Search option and search for the Stage Manager tool. It is located in the Desktop and Dock option. You can even select Desktop and Dock to locate this option.

Step 3: Select Customize
Once you select the Stage Manager option, click on the Customize option to customize this tool on your Mac system.
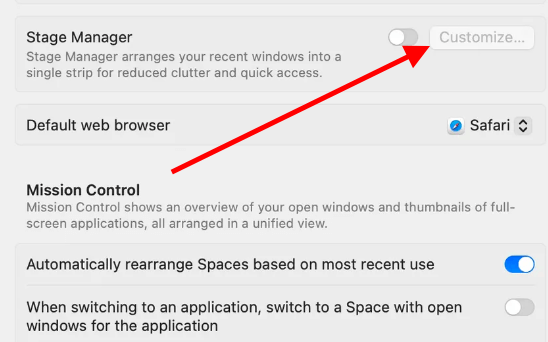
You can change its behavior or its appearance from here. You can also select the items you want to show up on the task manager for multitasking.
Steps to Customize Stage Manager on Mac
You can even change the appearance of the Stage Manager the way you want by simply customizing it as per your needs. You can also change its behavior right from the customizing window. Here’s how you can customize the stage manager on the Mac system.
Step 1: Open System Settings
Go to the Apple Menu and select the System Settings option.
Step 2: Search for Stage Manager
Click the Search option and search for the Stage Manager tool. It is located in the Desktop and Dock option. You can even select Desktop and Dock to locate this option.
Step 3: Select Customize
Once you select the Stage Manager option, click on the Customize option to customize this tool on your Mac system.
You can change its behavior or its appearance from here. You can also select the items you want to show up on the task manager for multitasking.
How to Disable Stage Manager on Mac?
Now, if you don’t want to mix up your desktop screen with such apps, you can simply disable this feature to back to normal mode.
To disable the stage manager app, go to the Control Centre from the upper right corner. And click on the Stage Manager option which is enabled. Once you click the enabled Stage Manager icon, it will be disabled.