By utilizing all of your processor’s capabilities, you can greatly improve the performance of your computer by turning on every core. Similar to the brain of a computer, the CPU is made up of processor cores, which function as independent processing units with their own hardware and memory. The capacity to manage several tasks at once is the main benefit of turning on all CPU cores. So here is the ultimate guide on How to enable all CPU cores in Windows 11.

Contents
Why You Should Use All CPU Cores?
Similar to how distinct brain regions cooperate to carry out different tasks, CPU cores cooperate to process tasks separately. The more cores a CPU has, the more effectively it can run more than one program or process at once. As a result, the system performs better overall and can multitask better.
Imagine that you are editing a video, surfing the internet, and participating in online discussions all at the same time. Your processor can assign particular cores to each task when all CPU cores are enabled, providing a seamless and continuous computing experience. This is especially helpful for resource-intensive tasks like playing games, editing videos, and using sophisticated software.
Although Windows automatically assigns CPU cores, you may want to manually enable them if you feel that your computer is not performing as well as it could. You may be able to access more processing power by dividing the workload among all of the cores that are available. This will lead to quicker task completion and better responsiveness.
When all CPU cores are enabled, your computer can effectively manage multiple tasks at once, which improves performance and makes using it more enjoyable, particularly when you’re doing resource-intensive activities.
Check the Number of Cores in your Computer
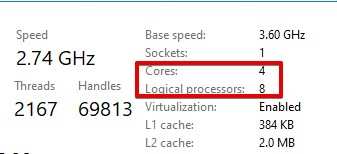
Understanding the number of CPU cores your PC contains to help you troubleshoot effectively. It is easy to determine the number of cores and logical processors all you have to do is:
- Press the Ctrl + Shift + Esc button to open the Task Manager.
- On the left side, hit on the Performance tab.
- Select CPU and you will face all the information you need. Refer to the image to know where exactly you will find your cores and processor information.
How To Enable All CPU Cores
Turn On Multi-Core Support
The first activation in the BIOS is enabling multi-core support. As the name says, it will give your computer a base for running all the CPU cores. Follow the steps to access multi-core support and enable it.
- Switch Off your computer if it is not already.
- Now power On to your PC and when it is in the initial stages of start-up, press F2 or F10. These two keys will help you enter your computer BIOS menu. Depending on the manufacturer of your PC’s motherboard, the buttons to access BIOS can also be Delete or Esc button. You can figure out your specific buttons by looking at the screen when your computer is booting up.
- When your monitor is showing the BIOS, go to the CPU settings section. It is hard to tell you where the CPU Settings is located since the interface will be different from computer to computer.
- Right inside the CPU settings, go to the section that says something like active multi-cores or processor cores. You may find the option under the Advanced CPU section.
- You will be able to change the amount of cores from the active core option. Select the Maximum core count or simply choose “all”.
After completing the activation of multi-core, you have approved your motherboard to utilize all the CPU cores. As a result, the performance may significantly increase. However, the effectiveness of such an act works when you also enable HyperThreading. So do not exit the BIOS as you the next task as a follow-up. On the same page, find the HyperThreading option and simply put it on enable.
Use the System Configuration Tool to enable all CPU Cores
Users can easily control CPU core utilization with Windows’ System Configuration tool, which will ultimately improve system performance.
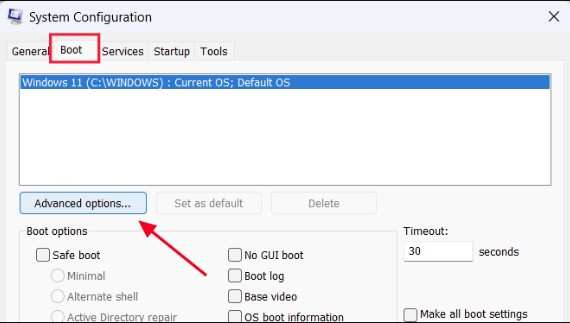
- To use this tool, just open the Run dialog box by pressing Windows + R, type “msconfig,” and click “OK.” By doing this, the System Configuration window opens.
- Select ‘Advanced Options’ under the ‘Boot’ tab in the System Configuration window. This is where you can change the number of processors your system is using.
- For best performance, check the box next to “Number of processors” and choose the highest number from the drop-down menu.
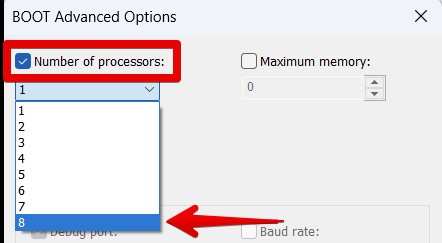
- Once your choice has been verified, click “OK,” “Apply,” and then “OK” once more to make the changes.

- To ensure that the changes take effect, the system must be restarted.
Conclusion
Your processor’s full potential can be unlocked by turning on all of its CPU cores using BIOS and the System Configuration tool. This improves task distribution and overall system performance.