Disabling your laptop keyboard is not a difficult problem, but there is no official feature available in Windows. Even the laptop manufacturer did not provide an option to disable it physically or software-based. Fortunately, we have robust solutions that come in handy, but it is a roundabout method. We have compiled several solutions that get the job done regardless of the limitations.
Contents
Create a Restore Point
Don’t be courageous in this matter because things can go wrong at any moment, so we recommend the readers to create a restore point to return to the past. All of the methods that were shown here work flawlessly on Windows 8.1 and Windows 10 running computers.
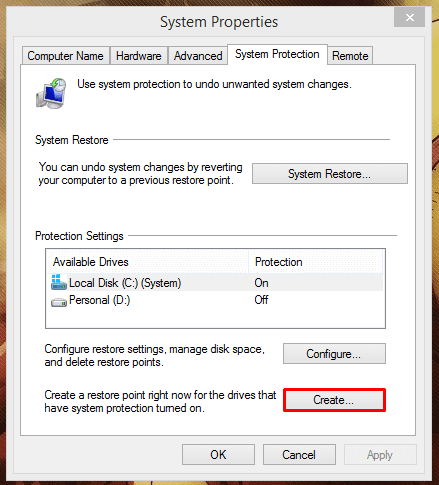
Press Windows Key + S for the search bar and then type “Create a Restore Point” in Windows 8.1 and Windows 10 running machines. A small window shows up on the screen and click on “Create” to save the current settings. Don’t implement any solution without creating a restore point, and that goes for every tutorial that you read on the internet.
Disable or Uninstall the Driver
Microsoft added “Device Manager” for transparency and also to control the drivers in the Windows machine. The feature is added two decades ago and is available for the administrator account holder to access it. Of course, you can reinstall the drivers or Windows will install necessary drivers automatically, which is a traditional method. Microsoft brought DM features two decades ago, which makes the tutorial compatible with previous editions.
Note: You need a USB wired mouse and keyboard if something goes wrong.
Step 1: Press Windows Key + S for the search bar and then type “Device Manager” and click the option.
Or
Press Windows Key + R for RUN application and then type “devmgmt.msc” and hit enters to open it.
Step 2: Let the Device Manager load correctly, and consumes less than 5 seconds on older laptops.
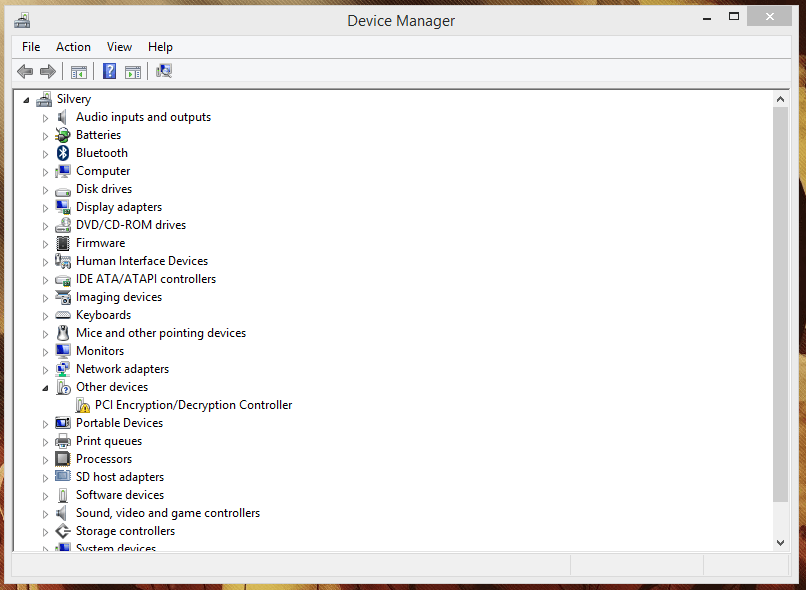
Step 3: Look for “Human Interface Devices” and click on the arrow button located at the corner of the option. The drop-down menu will reveal the connected devices and running devices in the section.

Step 4: In most cases, you can quickly tell the differences between USB Device or HID Keyboard Compliant. In our laptop, we don’t have simple information to tell the difference, and we have to figure this out.
- The HID-compliant consumer control device
- HID-compliant system controller
- USB Input Device – iPhone connected via lighting cable
- USB Input Device – USB keyboard connected
- USB Input Device – USB Mouse connected
We have three “USB Input Device” in the list, which means that we have connected three external USB devices to the laptop. We have connected iPhone, Wired Keyboard, and wired mouse.
We are leaving “HID-compliant consumer control device” and “HID-compliant system controller” unexplained. One of them has to be a laptop keyboard, and we have figure out.
Step 5: Select one HID-compliant device and right-mouse click for more options, and then click on “Disable.”
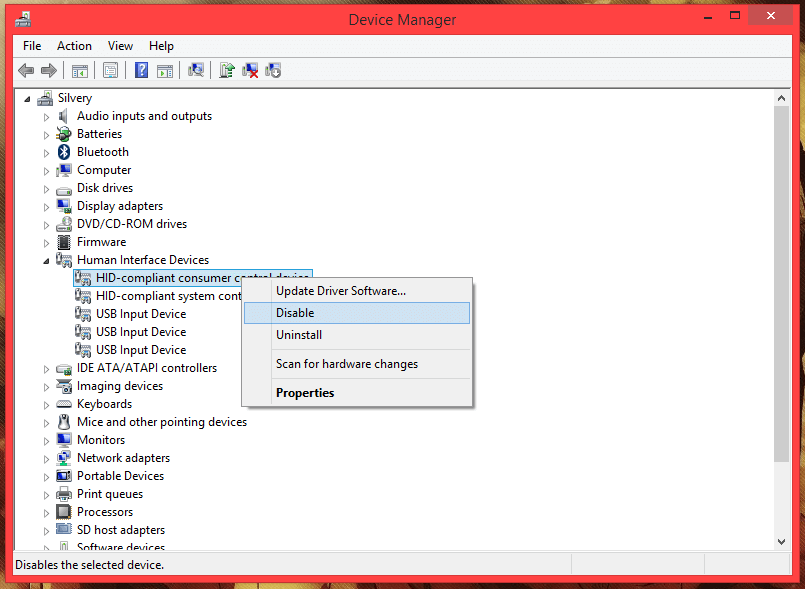
Step 6: Restart the computer.
Now, check if the laptop keyboard is working or disabled successfully. Also check, whether laptop mouse is not working or not. One of the laptop inbuilt devices should be disabled, and it could be Keyboard or Mouse.
In case, if you have mouse disabled, then go back, and enable the HID-compliant device and disable the next one, and restart the PC. You have no other choice but to try the options manually.
2. Group Policy Editor
Windows PC administrators can disable the function permanently without worrying about manual work. Microsoft added Group Policy Editor long back, and that will come in handy to control the inbuilt features. Of course, you can revert the changes and make the keyboard work again.
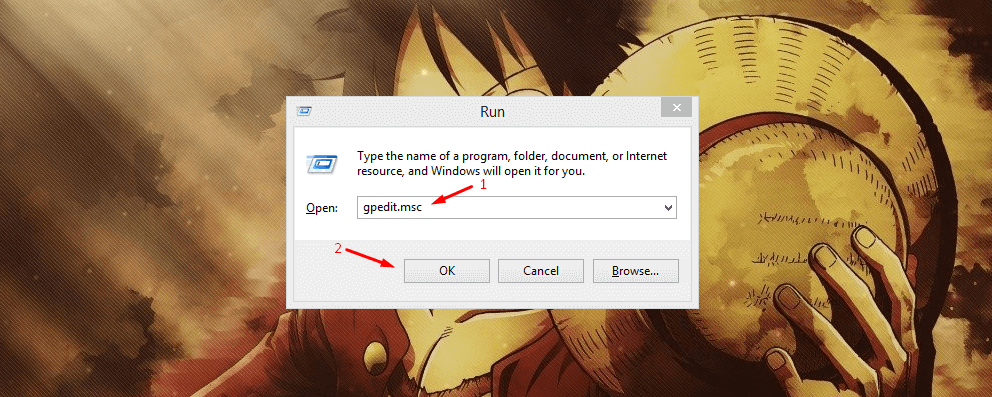
Step 1: Press Windows Key + R for run application and then type “gpedit.msc” and hit enter.
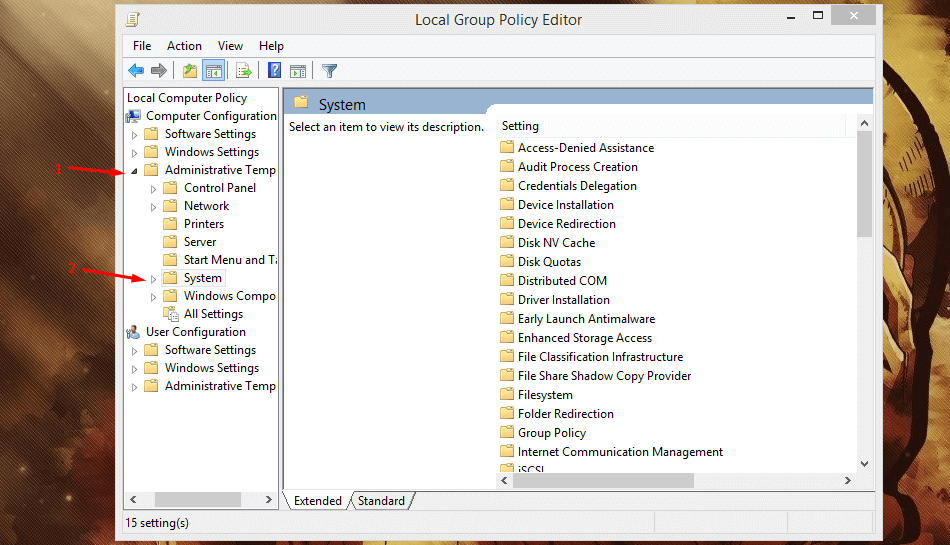
Step 2: Under “Computer Configuration” click on “Administrative Templates” for the drop-down menu.
Step 3: Under “Administrative Templates,” click on “System” to continue.
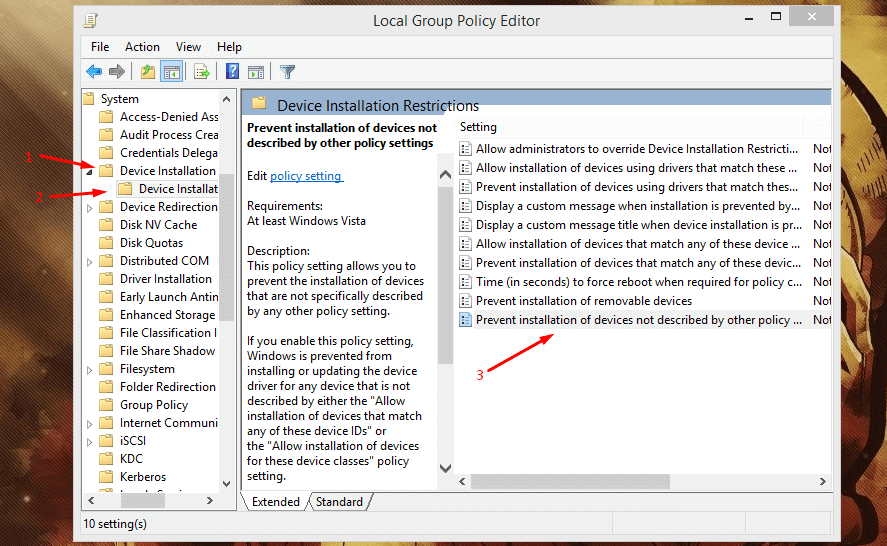
Step 4: Find “Device Installation Restriction” and then click on it.
Step 5: In the DIR, you can spot “Prevent Installation of Devices not described by other policy settings” and click to edit it.
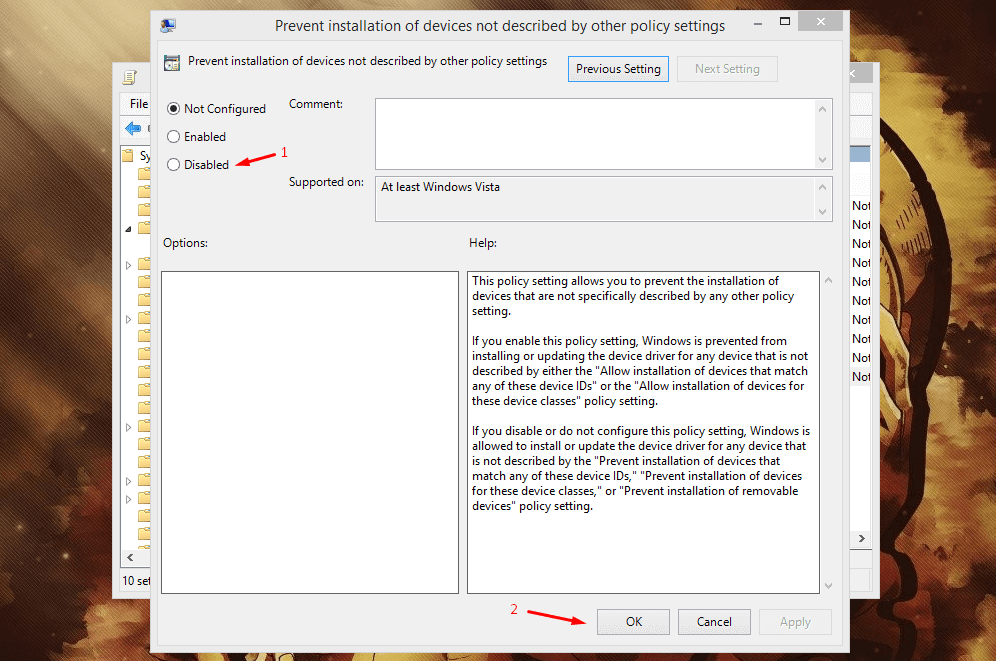
Step 6: A new window will show up on the screen and select “Disabled” and then click on “ok” to complete the changes.
Reboot the computer. Go to “Device Manager” and uninstall the keyboard driver and follow the first method instructions to do so. You can revert the changes by bookmarking the webpage. Windows will automatically install removed drivers to make the laptop keyboard functional.
3. Disable Laptop Keyboard using 3rd Party Solutions
There is plenty of third-party software available in the web market free-to-download, and it will make a significant difference temporarily.
Download KeyFreeze : https://keyfreeze.com/

We ran Virus Total security check to confirm that it doesn’t contain Malware, Virus, Adware, or any sort. You have to install a driver that controls the keyboard at will and allowing you to disable or enable it.
Bottom Line
Follow the Windows PC methods because you don’t have to rely on third-party apps. If something goes wrong, then you revert it by following the same instructions backward. Readers have System Restore function up and running to return to the earlier point.