 SSD or Solid State Drive will in no doubt will increase the speed of your PC or Laptop running Windows 10 OS and in turn increases your productivity. But most of us have 1TB hard disk as a standard in your system and cloning or moving data to less size i.e 250GB or 500GB is kind of difficult as you can’t shrink 1 TB to 500GB with any software or tools. As far your work is concerned you will need less than 100 GB and Windows 10 OS after installation will be around 40 GB and with necessary software it will come around 50GB.
So in this tutorial, I will show you exactly how you can move your hard disk (which is 1TB or any size) data to a smaller SSD without any fail.
In short we are cloning Windows 10 OS with boot image to a brand new small Solid State Drive
Things I have before moving the data
- A laptop with 8GB RAM
- My current hard disk (make Samsung, supplied by Lenovo) which is 1TB ( 300GB C Drive 50GB occupied by Windows 10 OS 64 Bit version with some other documents, D drive for rest of space)
- SSD (Samsung Evo 850 250 GB or any other company)
- Hard Disk Enclosure with USB 3.0( You can purchase this from Amazon), third party enclosure won’t work with Samsung cloning software
- A small star screw driver for removing the back of laptop, sometimes you will get this with your enclosure
- A 100% free migration software (A MUST HAVE)
- My OS : Windows 10 Creators Build
Clone HDD to Smaller SSD | Let’s start
Some Samsung SSD like 840 PRO comes with a migration adapter, remove the SSD packing cover and connect the SSD to adapter or if there is no adapter in your pack like in my case, insert the SSD to the Hard Disk enclosure and connect it via USB 3.0 (for faster data transfer) to your laptop.
Almost all of the SSD comes with a cloning or data migration software and don’t waste your time with this software as it needs the destination disk to be of same or bigger in size. I wasted around an hour with software and finally came to know its not possible to clone by 1 TB disk C drive to new SSD.
So what’s next ?
Use a third party software and if you go there and search in Google you will get a tons of software, believe me 99% of the software will charge you
Stay away from these tools if you don’t have or don’t want to spend money on single use cloning software
- EaseUS
- AOMEI Partition Assistant
- Acronis True Image ( but its free for Kingston users, a key or serial number will be there in the pack, here is the link : https://www.kingston.com/us/support/technical/acronis-download )
Macrium Reflect its free, but you need 1 TB Hard Disk and 1 TB SSD, but there is a way to clone with this software, source : Tomsguide, do note I haven’t really tried this method! So I don’t know if it have boot image and UEFI
1. You have to make an image of the old drive
2. Under the ‘Restore’ tab in Macrium Reflect, go to ‘Browse for an image or backup file to restore’
3. Select the correct image (*.mrimg) file, and click ‘Restore Image’.
Clonezilla : “The destination partition must be equal or larger than the source one.” Its written on their website
Now I have seen in some forums that people recommend some cracked version, my advice – don’t ever use these, the zip file will definitely have malware/virus/any hijacker/Trojan and it will destroy your laptop and you will need to spend more money to clean up the mess caused by these.
Now before starting the process if you have time just use some duplicate files finder and run it for once. Remove the duplicates. Next do C drive defragment process. If there are big video files in C drive move it to other drives.
So why you need to do all the above ?
It will save SSD from write wear off.
So let’s start
Now insert the new SSD to Hard Disk enclosure and connect it to USB 3.0 or above, in some laptops USB 3.0 port will be blue in color.
Now the first task is to format the new SSD, for this follow these steps
Note : I am using my Flash drive 8GB instead of SSD for writing this guide, because I can’t rewrite another 60GB of data to my SSD, whatever I writes below are exactly the steps I followed for a fresh SSD cloning.
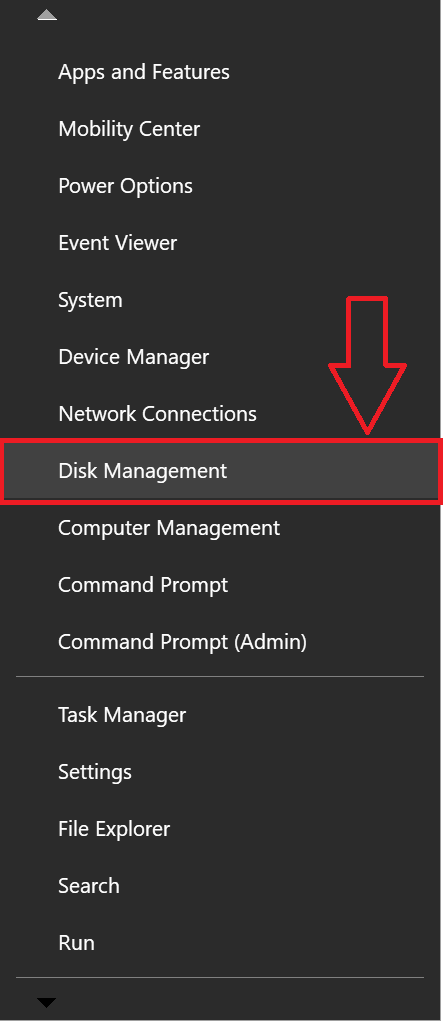
Step 1 : Click Win key + X
Step 2 : Choose “Disk Management” like show below
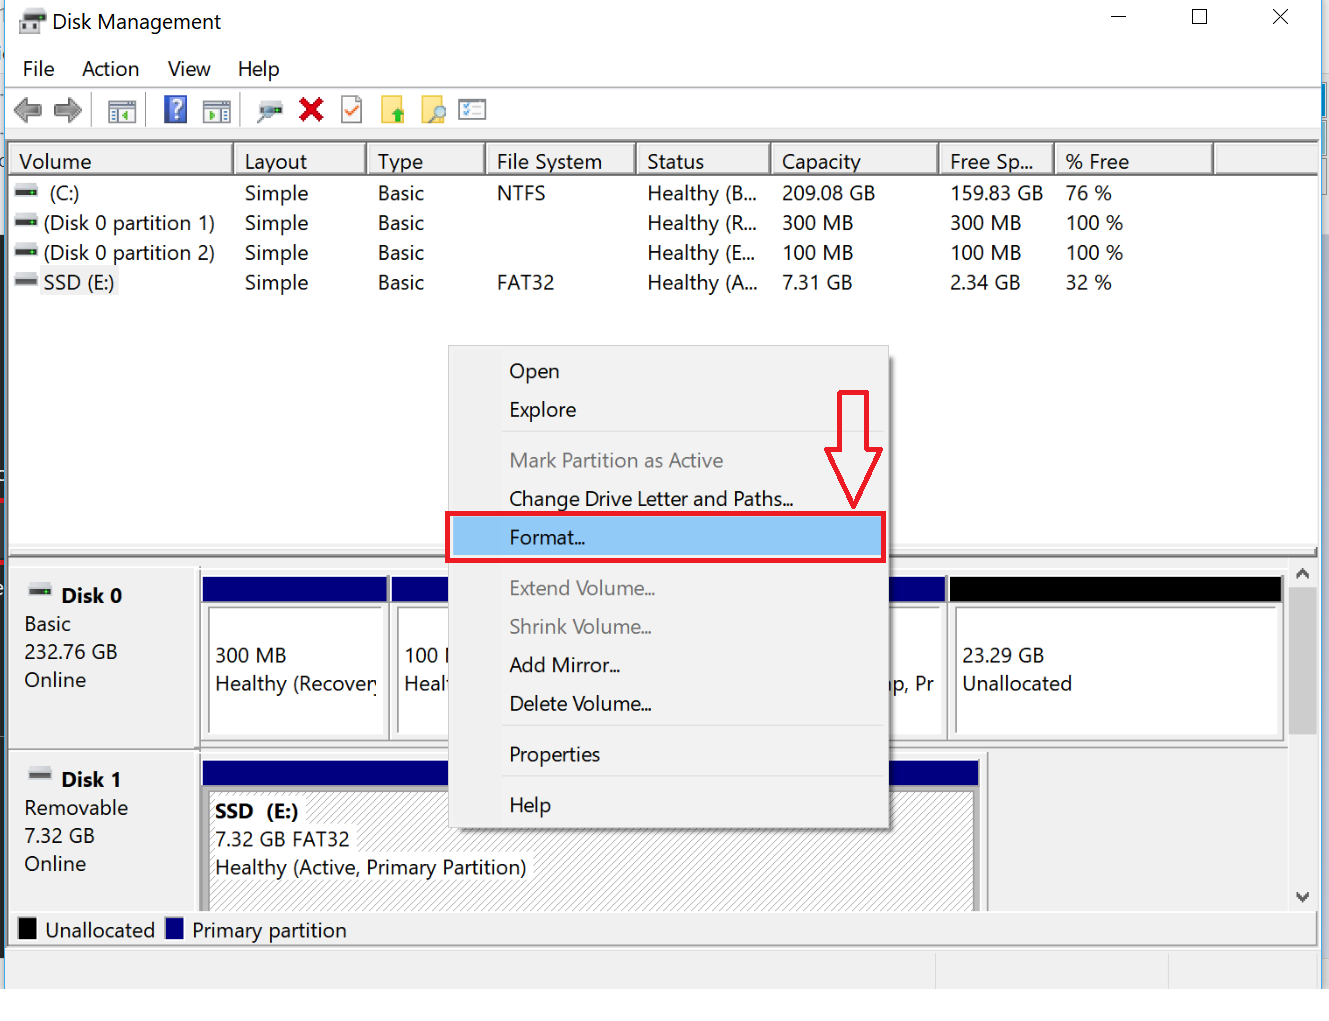
Step 3 : Now right click on the SSD drive and hit “Format” like show below
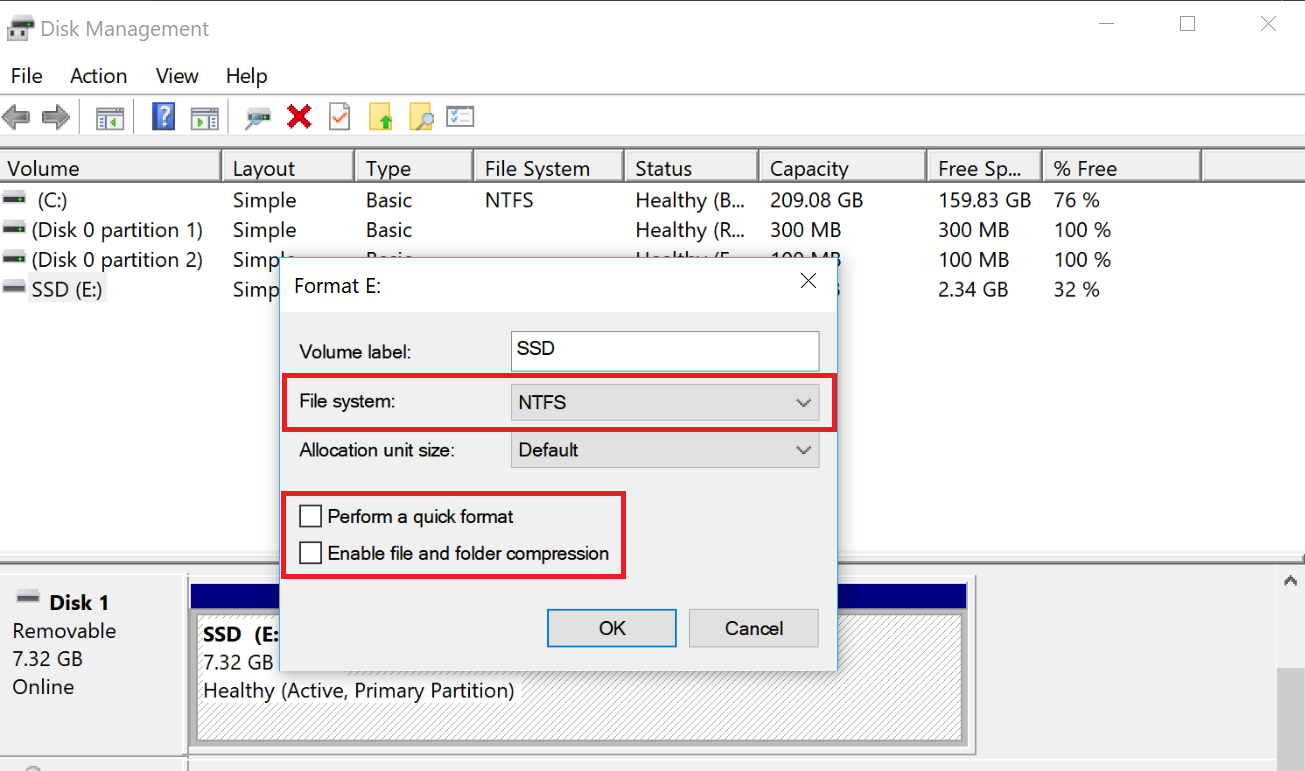
Step 4 : From next context menu choose the format as “NTFS” and disable quick format and hit “OK”
Step 5 : Now your SSD is formatted.
Next you need to check if your current SSD is MBR or GPT partition and for this follow these steps
Note : My Samsung EVO 850 was GPT after formatting and I can partition my disk to 4 volumes, C, D, E, F.
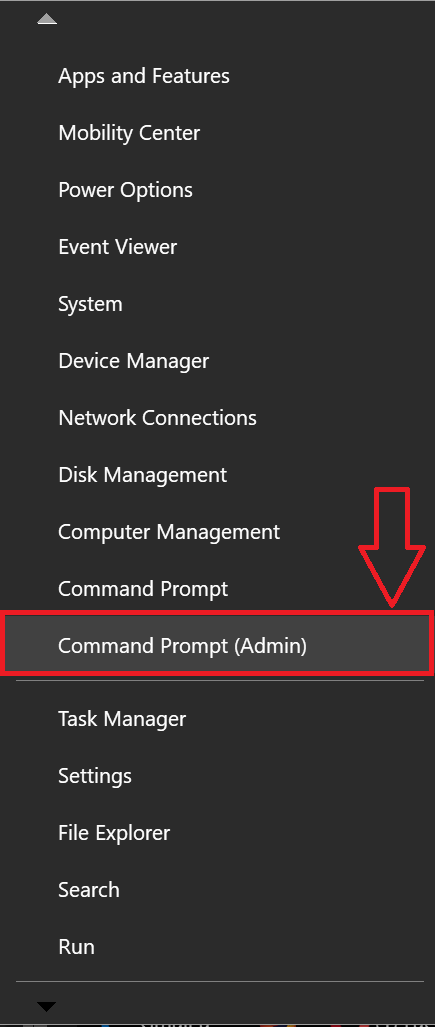
Step 1 : Hit Win key + X
Step 2 : Choose “Command Prompt(Admin)”
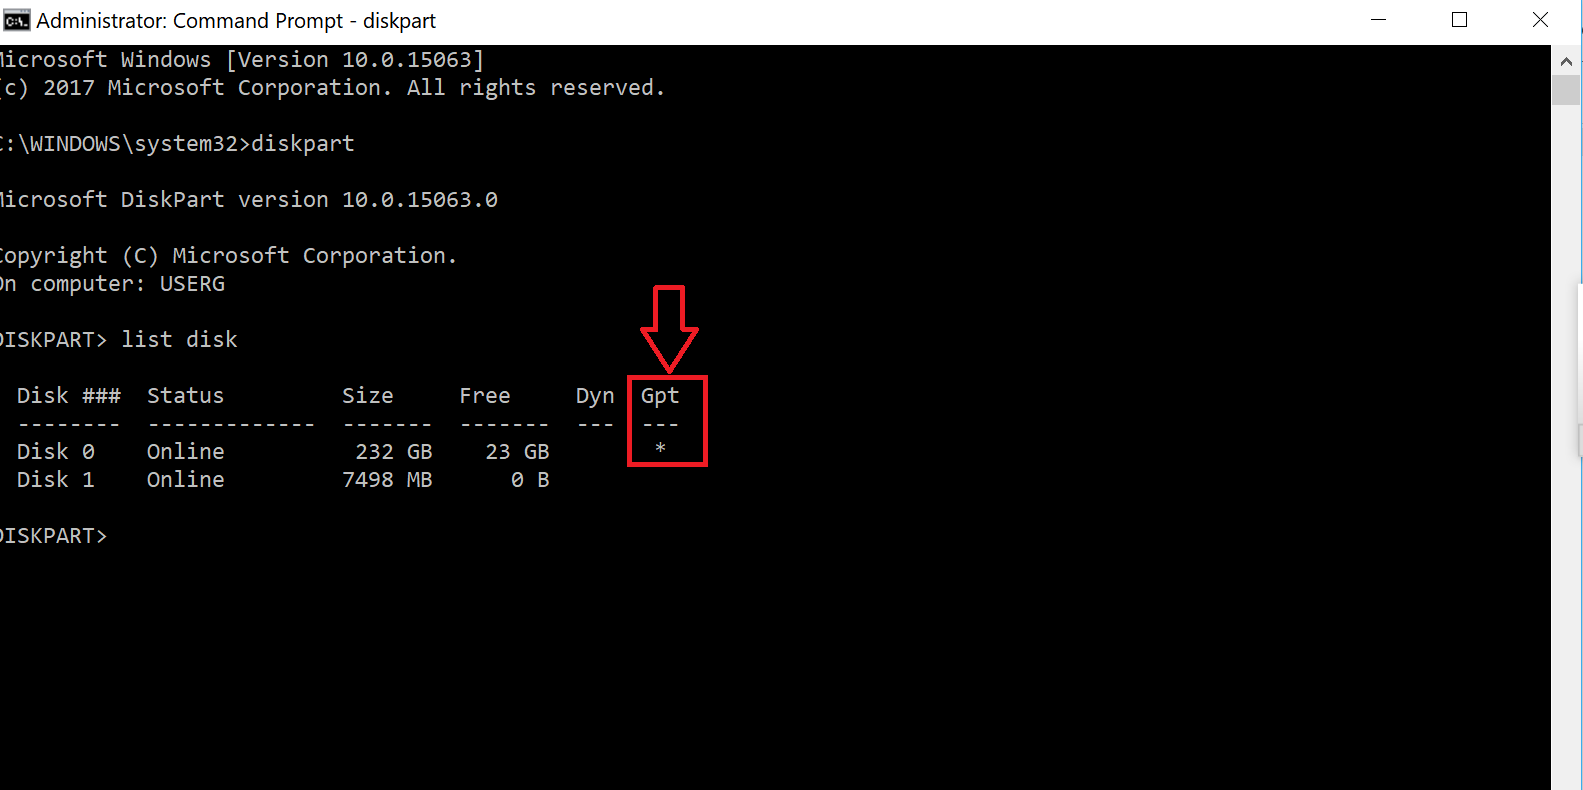
Step 3 : Now enter these commands and press enter after each command
diskpart
list disk
Step 4 : You will see asterisk like this * if the disk is GPT
Else you may need to convert it to GPT from MBR, and here is the guide for that : https://www.howtogeek.com/245610/how-to-check-if-a-disk-uses-gpt-or-mbr-and-how-to-convert-between-the-two/
After hours of research I came to know about this software as other software (except Kingstons as they provide valid license free of cost) don’t allow you to clone nor move data from a bigger disk to small SSD.
- Software name : Renee Becca
- Download link : https://www.reneelab.com/download-center/renee-becca
- Price : 100% Free (no hidden charges nor anything like that)
- License required : Yes, a valid license code will be mailed to your email after you enter your email id here (you can use some temp mail to get the license ) : https://www.reneelab.com/free-license
Steps for using this software
Note : Make sure the laptop is connected to AC supply or have enough battery charge. If yours is PC make sure your UPS works properly or if you have inverter or generator just switch it on, to be on the safe side.
Step 1 : Now install the software and open it, activate the software by entering the key you received in Email.
Step 2 : Click on “Clone” and then “System Redeploy” like shown in the pic below
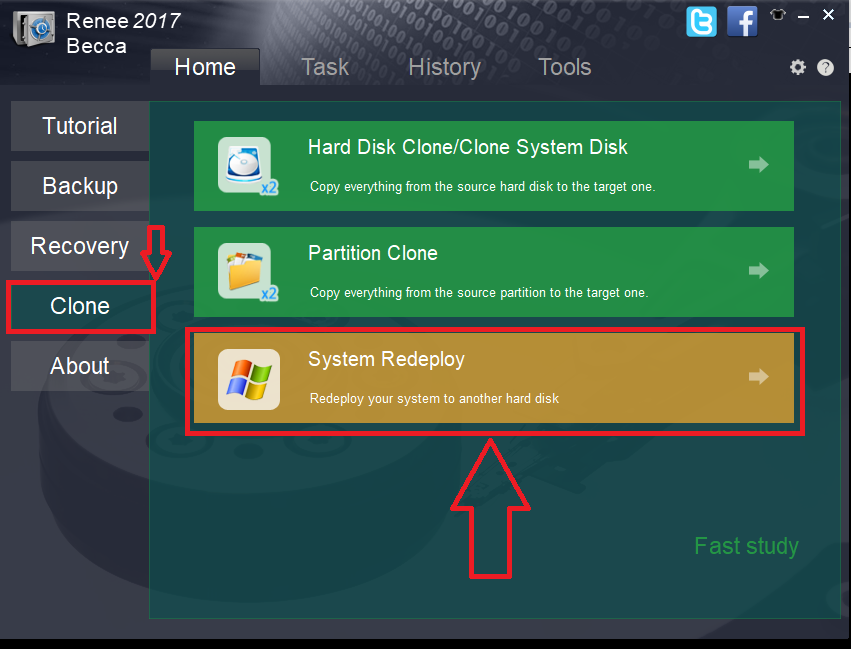
Step 3 : Now choose the “Destination” and it should be your SSD. Source should be selected as the drive containing Windows files and boot images etc, please refer to the pic below.

Step 4 : Now hit the “Redeploy” and hit “Yes” as show in the pic above.
Step 5 : Software will start the process and will complete the data transfer depending on your source disk size.
In my case 50GB of data was cloned within 20 minutes. And I closed the software, then uninstalled Renee Becca. I did that just because this software don’t have any further use unless you clone another SSD.
Replacing SSD with Hard Disk (HDD)
Step 1 : Now remove SSD from Hard Disk Closure. Remove the battery from laptop, to be on safe side. Open the laptop back with the small screw driver and remove the hard disk clamp screws (if you have).
Step 2 : Replace the HDD with SSD, now insert the battery back.
Step 3 : Now switch on the laptop.
There is no need to change any boot order or anything like that if your laptop comes with i3 4th gen chips or above.
The laptop will automatically tries to find the disk with boot info and show you the Samsung SSD in blue color with full black background. Sadly there is no screenshot for this part, I will try to add that when I switch it new SSD after 4 years.
Once you see the Samsung SSD written in blue color, just hit Enter and it will boot up from SSD.
That’s all, your laptop from now on will boot Windows 10 from SSD with blazing speed.
So after successful booting do the following
Install Samsung Magician software which can be downloaded from here (http://www.samsung.com/semiconductor/minisite/ssd/download/tools.html ) , don’t install the one that comes in the CD, as it will be older version and will ask for you to update to the latest build, so its actually wearing off your disk.
After installation, enable the Rapid mode (requires restarting) and after enabling it looks like this
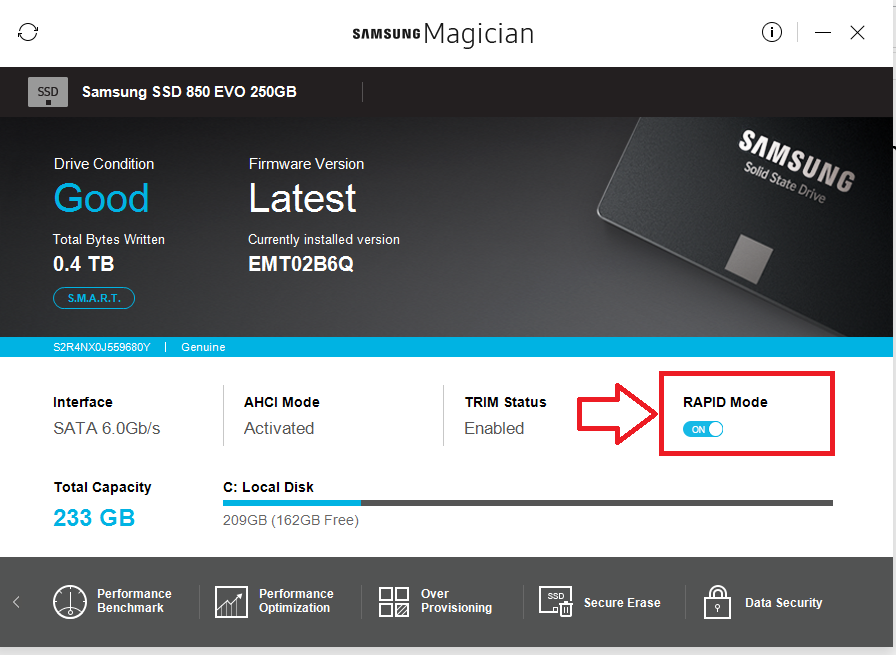
As you can see from the above pic, these are automatically shown in the Magician software
- Your laptop SATA is 6Gb/s
- AHCI Mode : Activated
- Trim Status : Enabled
If you don’t find your settings in similar to the one shown above take the help of Google Search Engine and search like “How to activate AHCI mode” etc.
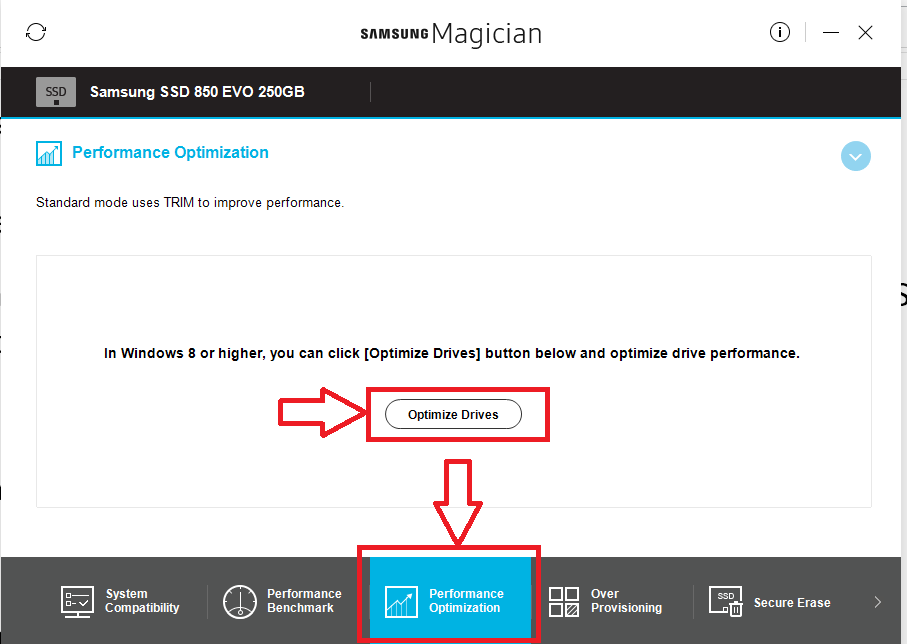
Optimize Drives
Select “Performance Optimization” tab from the magician software and select “Optimize Drives”
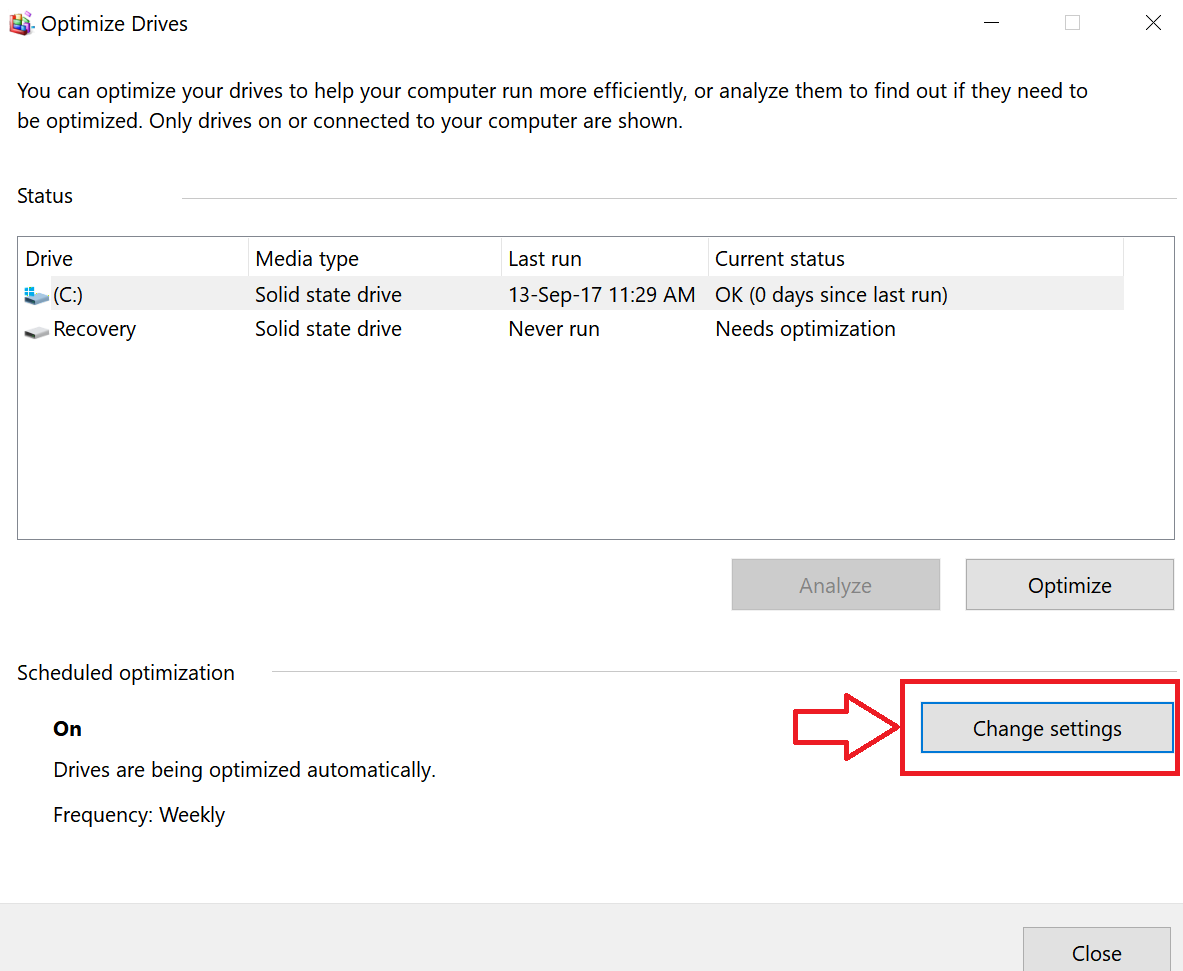
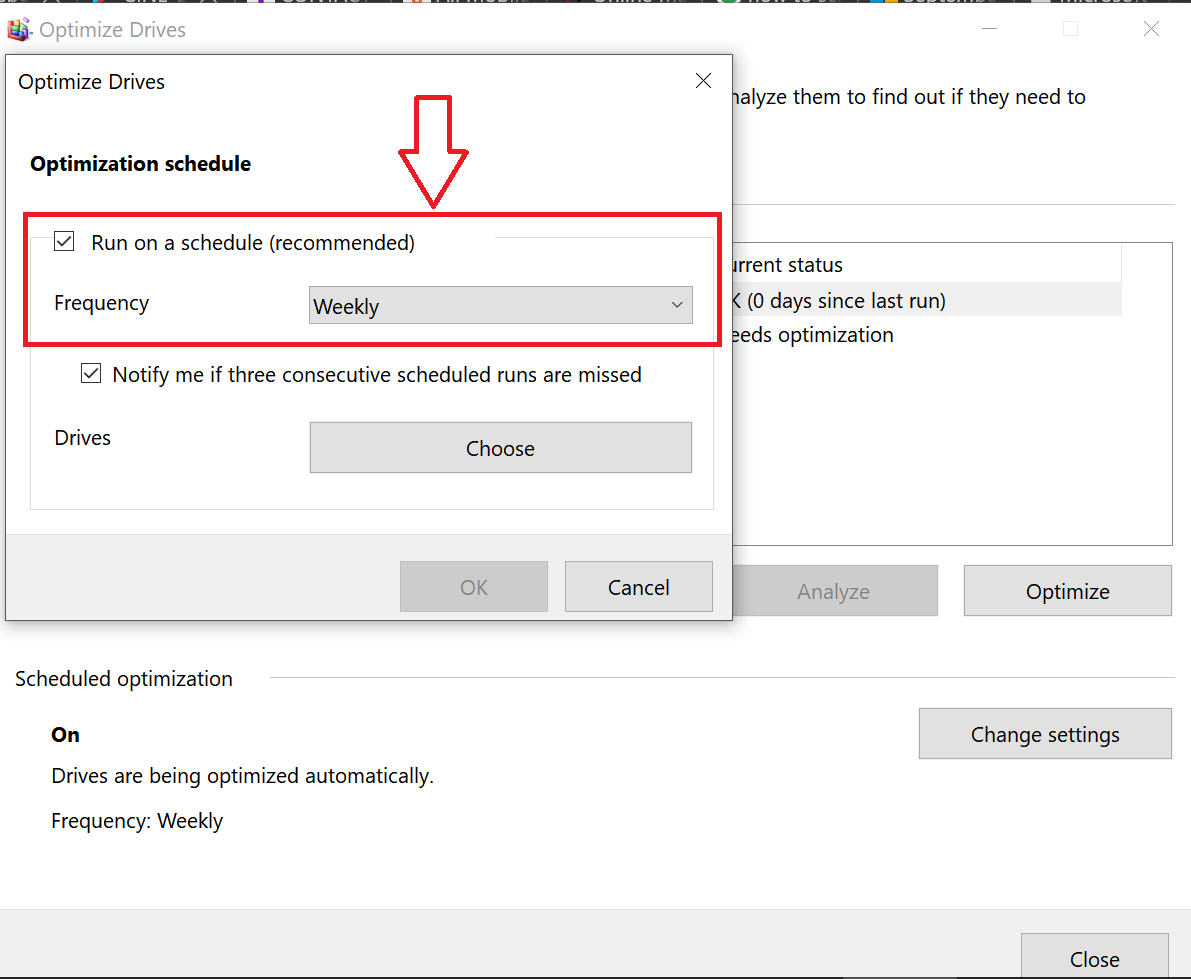
From next window, just schedule your optimization from “Change settings” and set it to run weekly.
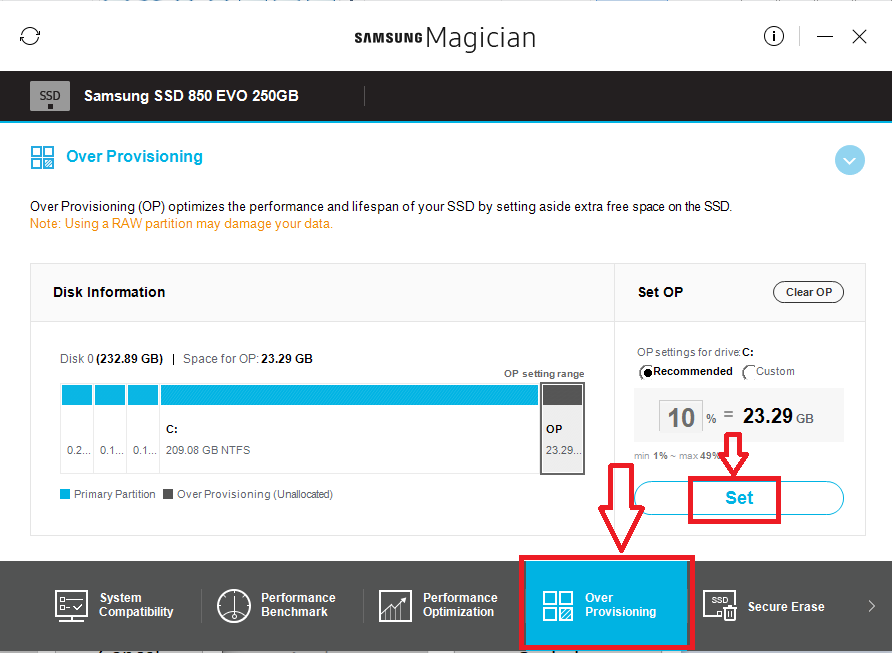
How to set Over Provisioning? This improves SSD life and performance as per the company
Move to “Over Provisioning” tab, and set it that’s all.
Here are some things needed to be watched or taken care off after switching to SSD.
SSD life mainly depends on total bytes written to disk and in my Samsung 850/860 EVO they are offering 75TB of data written to disk or 5 years whichever comes first.
- Turn off your hibernation and change that to sleep mode, if you always hibernate in laptop with SSD, your will be writing your entire data to SSD and its almost 6GB/day for most of the users. In long run your solid state drive will wear quickly. The sleep mode only takes very less power as data is stored to the RAM.
- Don’t download or copy big video files with size 10GB or more because copying 10 files with 10GB in size will wear 0.1TB
- Don’t do this performance benchmark with different software, doing this once is ok with a software.


Thanks for the guide, this is saving me quite some time in transferring to SSD!
Amazing, Thank you so much!
Oh men, after two days trying to Clone the HDD of my Laptop to a smaller SSD with several Softwares, I were close to give it up, but this just WORKS.
Thanks a lot!!
Our experience was same, hope we saved a lot of your time and money.
malware riddled
Its clean, no enterprise tools here found any issue with that!
Now, you can use the bootable disk to migrate Windows 10 to a new faster hard drive. Why clone a hard drive in Windows 10? Here are some of the common reasons why users want to clone their drives in Windows 10: Upgrading to a larger capacity drive in Windows 10.
Yea, this givaway doesn’t work and there are no licenses they give out.
May be its over now! Its really worth it.