Over time, when you have done multiple updates to your Windows 10, your system will store cache files. While there is nothing wrong with solely storing cache, it may create nuances in further Windows updates. As a result, it is important to make the habit of clearing the Windows cache.
Many users are stuck with their timely Windows update because of some faulty Windows files. You can solve most of the problems related to Windows by quickly clearing the Windows update cache. This article introduces you to the three amazing techniques that will clear your Windows 10 update cache.
Contents
Method 1: Clear Cache using the Windows File Explorer
You can use File Explorer to access the properties of all the drives/storage in your Windows 10. In this case, we will access the properties to clear the Windows update cache.
- Go to the Windows Cortana box and search for Windows Explorer. OR you can open up the Windows Explorer via the start menu. Regardless, the goal here is to open the explorer.
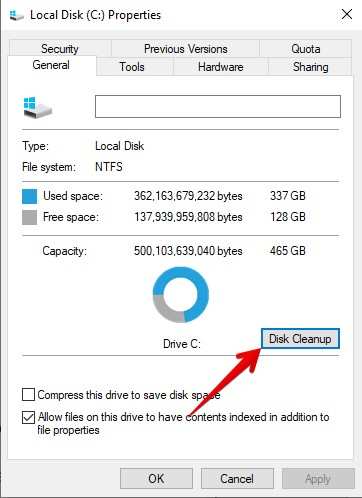
- Do a right-click on the C local disk (assuming it is where you have installed your Windows 10).
- Go to properties.
- After you open the properties, go to the option that says “Disk Clean-up”.
- Hover your mouse cursor on “Clean up system files” and click on it.
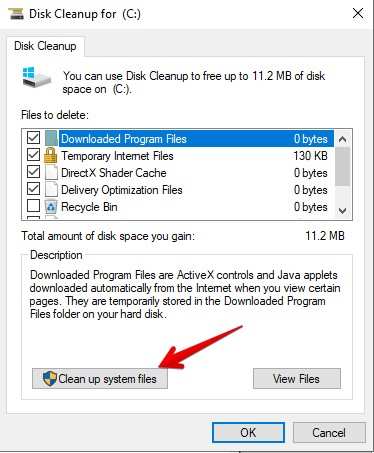
- The “Files to delete” option will show new items in the list. Check those new items which are “temporary files” and “Windows Upgrade log files”. After that, click “OK”.
- Now press the shortcut key Win + R to open the run command.
- Type “services.msc” inside the search box.
- The services application window will open up. There you have to go to “Windows Update”
- Right-click on the Windows Update button and click on “Stop”
Method 2: Clear Windows cache using the command prompt
Command prompt is a highly useful tool for accessing various things within the Windows system. In this case, you can also use it to clear the Windows cache.
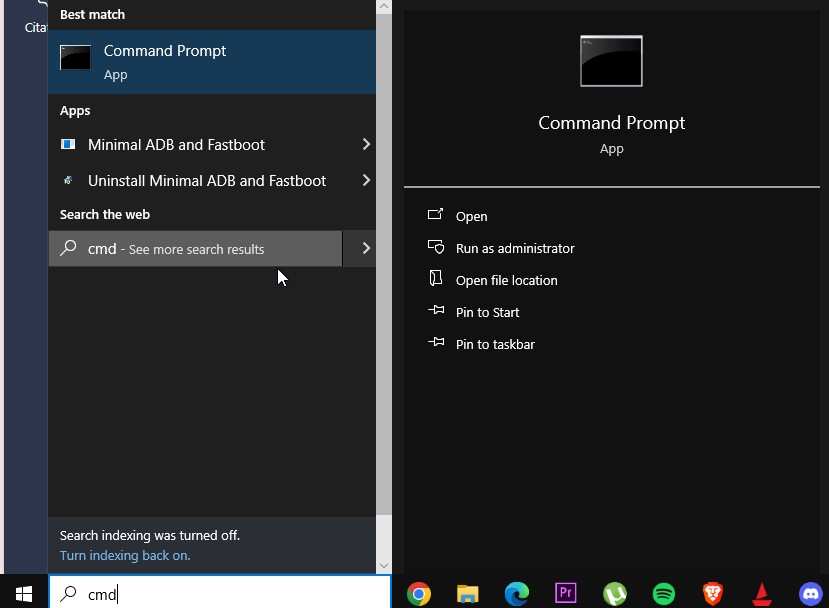
- Select “Windows Terminal (Admin)” or “Command Prompt (Admin)” from the menu by pressing Win + X. If this option isn’t there, try searching for “cmd” in the Start menu, selecting “Command Prompt,” and then selecting “Run as administrator.”
- Enter the following query into the Command Prompt window: net stop wuauserv.
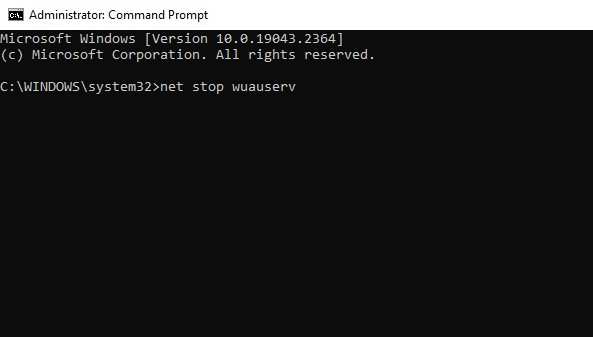
With this command, Windows Update is stopped so that it cannot interfere with the cache cleaning procedure.
- Enter the following command in RUN again and hit Enter to guarantee that all services connected to updates are stopped: net stop bits.
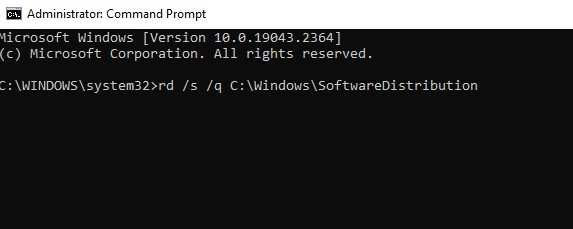
- You also have to remove all the Windows update cache from your computer. To do that, you have to clear all the files in the “SoftwareDistribution” folder. Run the following command in the prompt and hit enter: “rd /s /q C:\Windows\SoftwareDistribution”.
- Now you have to restart the update service as well as the bits service. Doing this will let your computer enable the installation of Windows updates. Here is the run command that you have to run:
– net start wuauserv
– net start bits
- After running the command above, type Exit to close the prompt.
- Now reboot your Windows system.
When you get to your computer again, it will not have any cache for Windows 10 update. The command prompt has let you clear all the cache files in the Windows update.
Method 3: Use Script to Clear Windows Update
You can also use the unconventional method of using a script as a Windows update cache cleaner.
- Go to the Windows search area type “notepad” and open it.
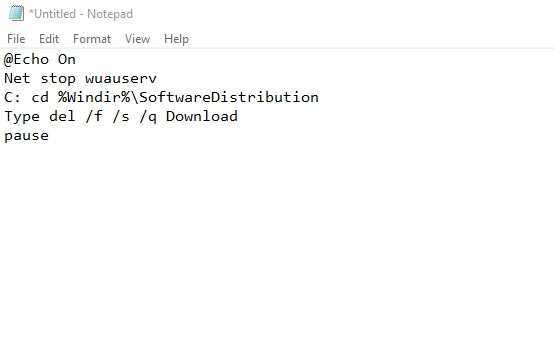
- Inside the blank notepad type the following code::
@Echo On
Net stop wuauserv
C: cd %Windir%\SoftwareDistribution
Type del /f /s /q Download
pause
- Now save the notepad as cleardown.cmd.
- Open it again via “Run as Administrator”.
- The script will run on your computer with a pause at the end.
At last, your computer will show the output of what the code has done.
Conclusion
Now you have understood the various methods that you can apply to get rid of unwanted cache files in Windows. Do these methods to remove and update cache files and update your windows without any issues. We hope this guide helped you delete Windows update cache files.