Are you stuck in the process of composing a mail due to an error? Perhaps that error might related to your Gmail account requiring one or more Google Play Services. This error comes as a pop-up as soon as you hit compose message. It can be annoying to not be able to send emails that may be important to your colleagues or clients.
In this article, we are going to give you ideas on how you can possibly get rid of this error.
Contents
The following methods may let you resolve the Play Services problem
Update Gmail App
You can make sure you have access to the newest features, enhancements, and security patches on your Android device by updating the Gmail app. Here’s a quick tutorial on updating the Gmail app:
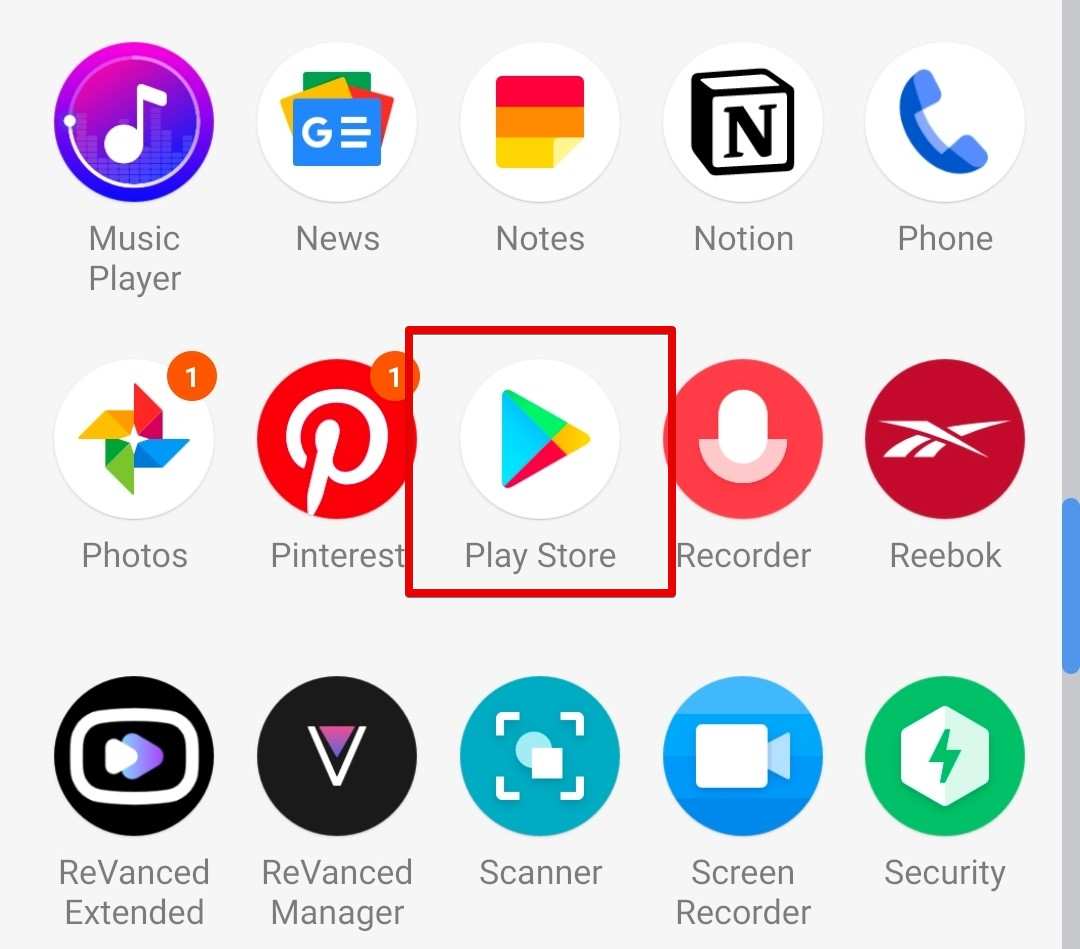
- Launch the Google Play Store: On the home screen of your Android device, tap the Play Store icon. If you do not know what the Google Play Store looks like then it looks something like a White carry bag and the cover of the bag contains a colourful triangle.
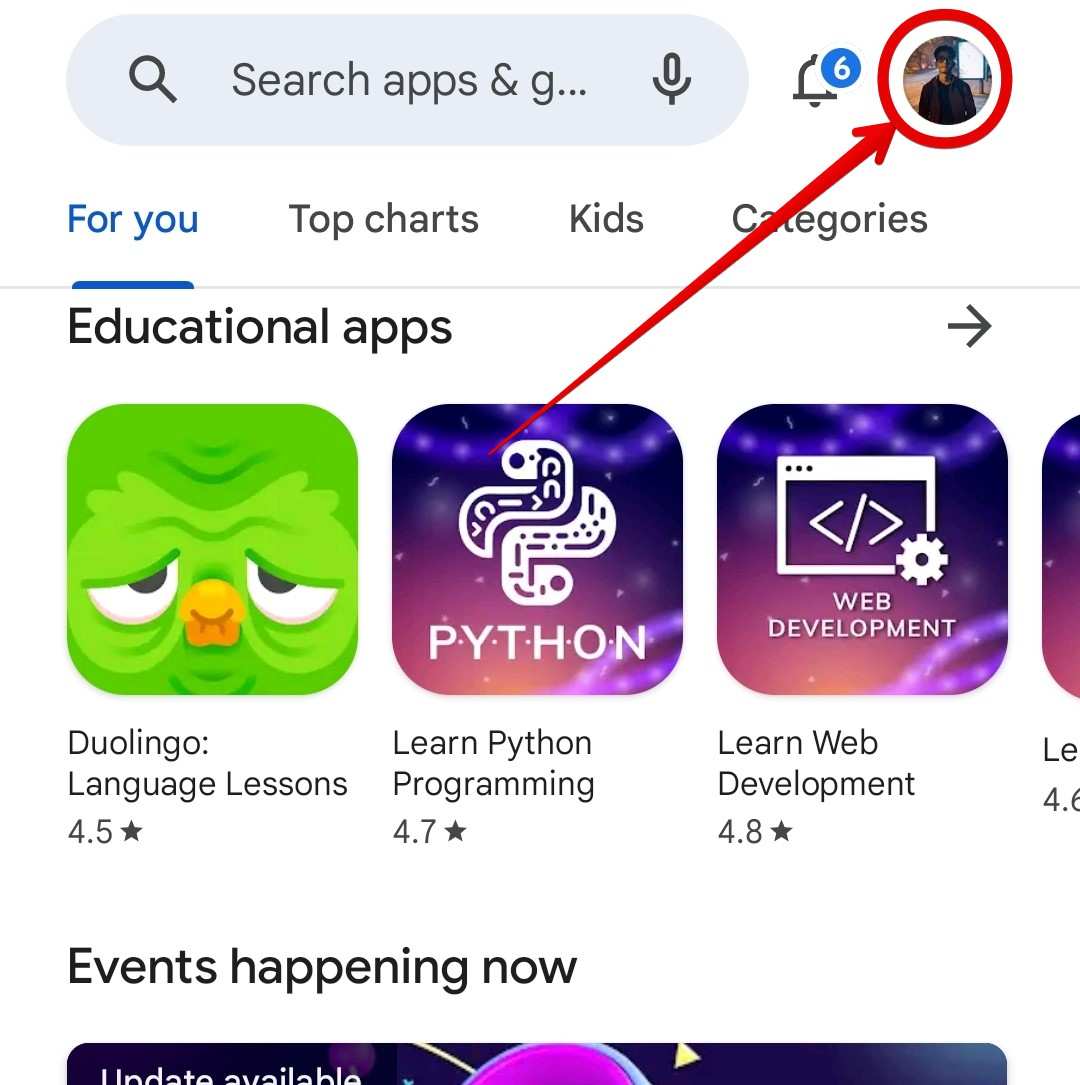
- Open the menu: In the Play Store, simply tap on your profile in the top corner to access the menu.
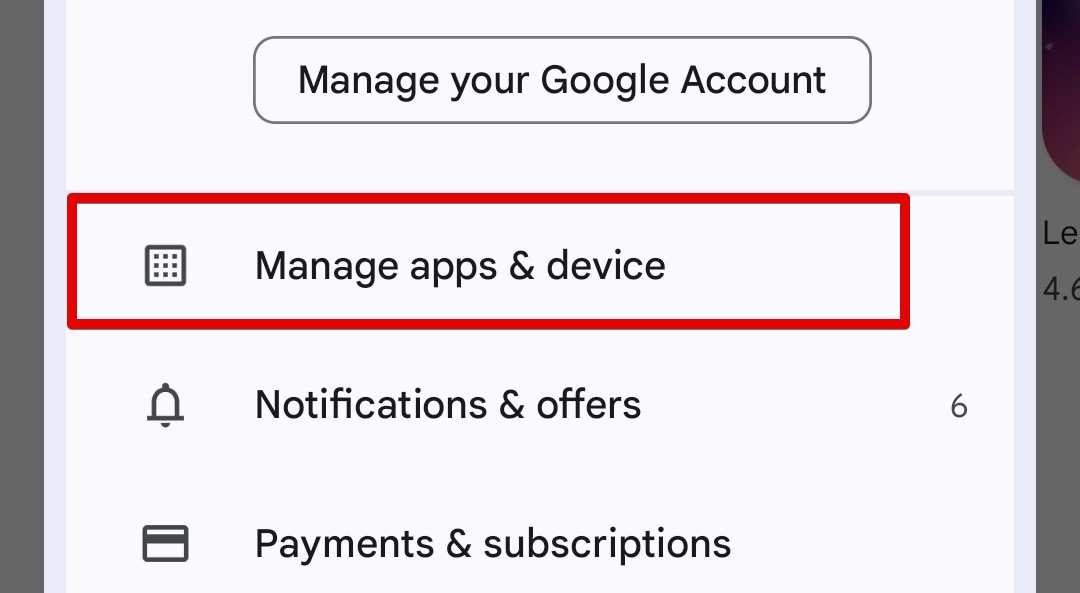
- Visit My Apps & games: Tap on Apps & games or Manage Apps & device After that, you will see a list of every app that you have on your smartphone.
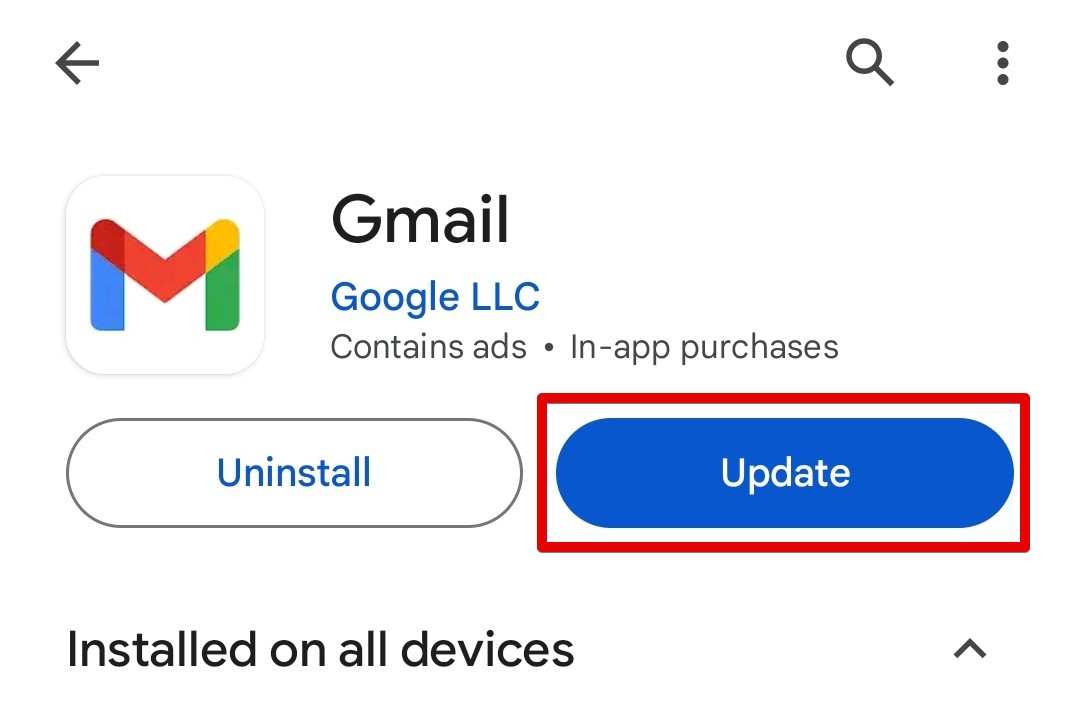
- Find Gmail: Locate Gmail by scrolling through the app list until you come across “Gmail.”
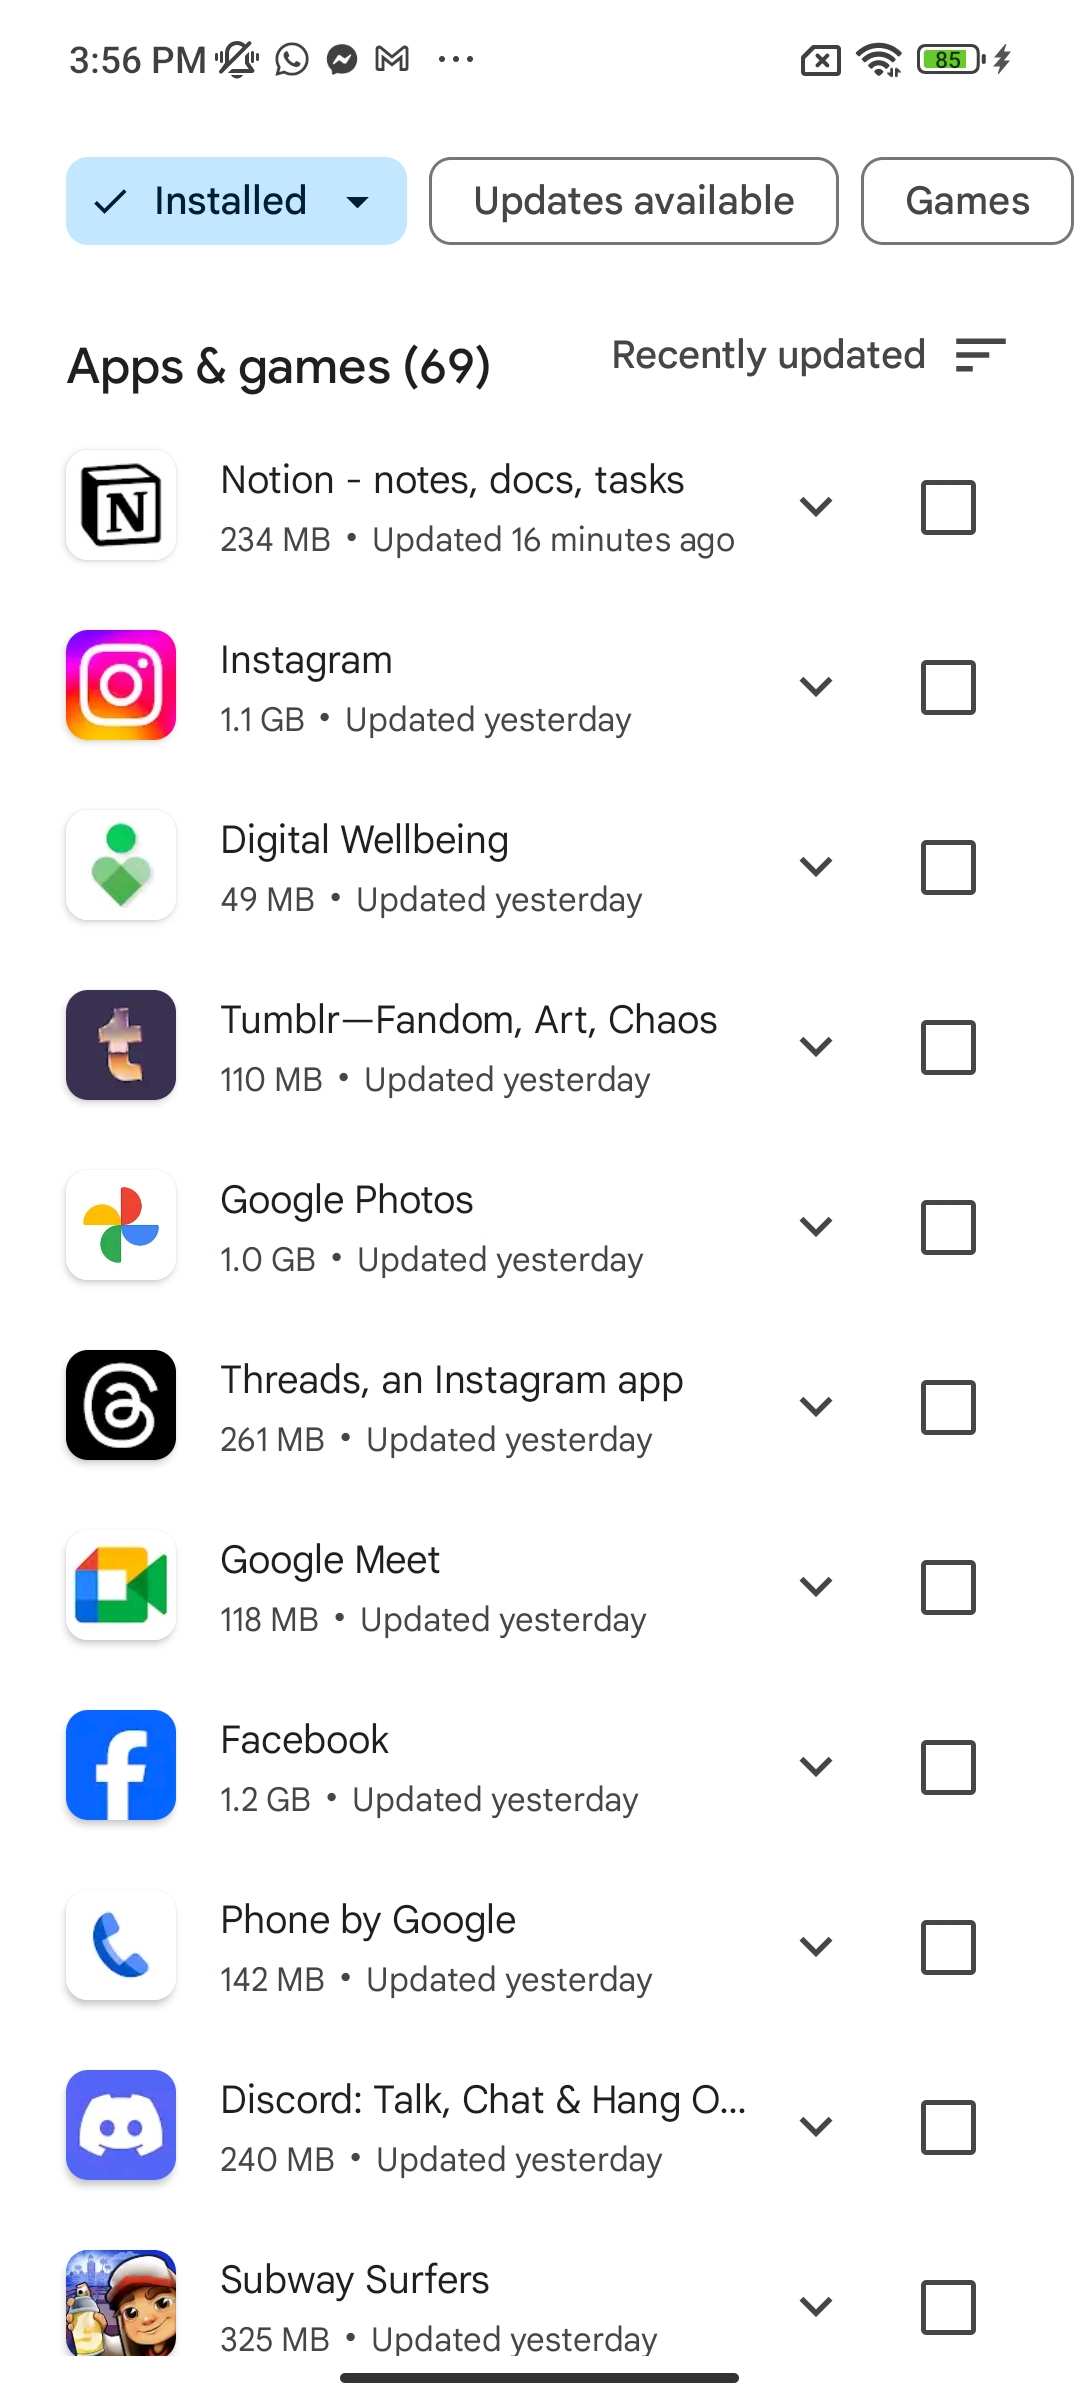
You’ll see the Gmail app listed here with an “Update” button next to it if there’s an update available.

- Update: Click the “Update” button to open the Gmail application. This will start the process of updating. It might take a few moments to finish, depending on the size of the update and the speed of your internet connection.
- Wait for the update: As soon as you select “Update,” the Play Store will start downloading and installing the most recent version of the Gmail app. Wait for the Update to Finish. A progress bar will appear to show you how the update is progressing.
- Open the Updated App: After the update is finished, you can open the Gmail app from your home screen or select “Open” from the Play Store.
- Check for Updates: You can check Gmail’s version number in the settings to ensure it has updated to the latest patch. Navigate to the Gmail app and press & hold on it. A pop option will come where you have to select on “App info”. In the information page of the app, you will see the version of the app right below the name “Gmail”.
Clear cache and App data
On your Android device, clearing the Gmail app’s cache and data can help fix a number of problems, including one or more Google Play service errors. Here are the detailed steps to delete the Gmail application’s cache and data:
To access settings, launch your Android device’s Settings app. If that’s not the case, you can easily find it by typing “Settings” into the apps grid’s search bar.
- Go to Apps & Notifications: To access the “Apps & notifications” section, either utilize the search bar or scroll down within the Settings app. To continue, tap on it.
- All Apps: Choose “See all Apps” by searching for it and tap on the “See all apps” option. All the apps currently present on your device will appear as a result.
- Navigate to Gmail’s settings: Find Gmail by scrolling through the app list until you locate the Gmail app. When you locate it, tap on it to access the settings.
- Access Storage and Cache: You can manage notifications, permissions, storage, and cache by going to the settings of the Gmail app. To continue, tap “Storage and Cache”.
- Clear Cache: The “Clear Cache” option will appear after you tap on “Storage and Cache.” This will get rid of the Gmail app’s temporary files, which occasionally cause performance problems.
- Clear Data (Optional): You can also opt to clear the app’s data if the cache clearing doesn’t fix your problems. But note that doing so will erase all accounts, settings, and preferences related to the Gmail app. Tapping on the “Clear Data” will erase all data inside the Gmail app.
- Confirmation: If you’re sure you want to remove the data or cache, a confirmation prompt might show up. Depending on your device, tap “OK” or “Clear” to confirm your selection.
- Restart the Gmail App: You can try closing the Settings app and relaunching the Gmail app to see if the problems have been fixed after clearing the cache and/or data.
These instructions will help you efficiently clear the Gmail app’s cache and data on your Android device, which will enhance performance and fix any related problems you might be having.
Update Google Play Service
It is pretty simple to put your Play service on an update. To update your Google Play service, follow the steps below.
- The first stop is the settings: tap on the settings app to get into the settings.
- Depending on what Android model you are using, you have to enter the app section. Generally, you have to navigate to apps & notifications.
- After that, hit on all apps or an option that lets you see the list of all apps installed on your phone.
- Click on “Google Play Service” and hit app details to see the app page on the Google Play Store.
- Tap on “Update” to install the newer version of Google Play Store.
The error “Gmail Requires One Or More Google Play Services, That Are Not Currently Available” is a fault from the developer’s end. In that case, doing the update and waiting for the issue to go away is your best solution.
Clear cache and data of Google Play Services
On your Android device, clearing the Google Play Services cache and data may be required to fix problems like the one we are dealing with here. It’s crucial to remember, though, that doing so might cause some saved data—like transit cards and virtual payment cards kept in Google Pay—to be deleted. Here’s how to delete Google Play Services’ cache and data:
- On your tablet or phone running Android, launch the Settings app.
- To see a list of all installed apps, tap “Apps” and choose “See all apps.”
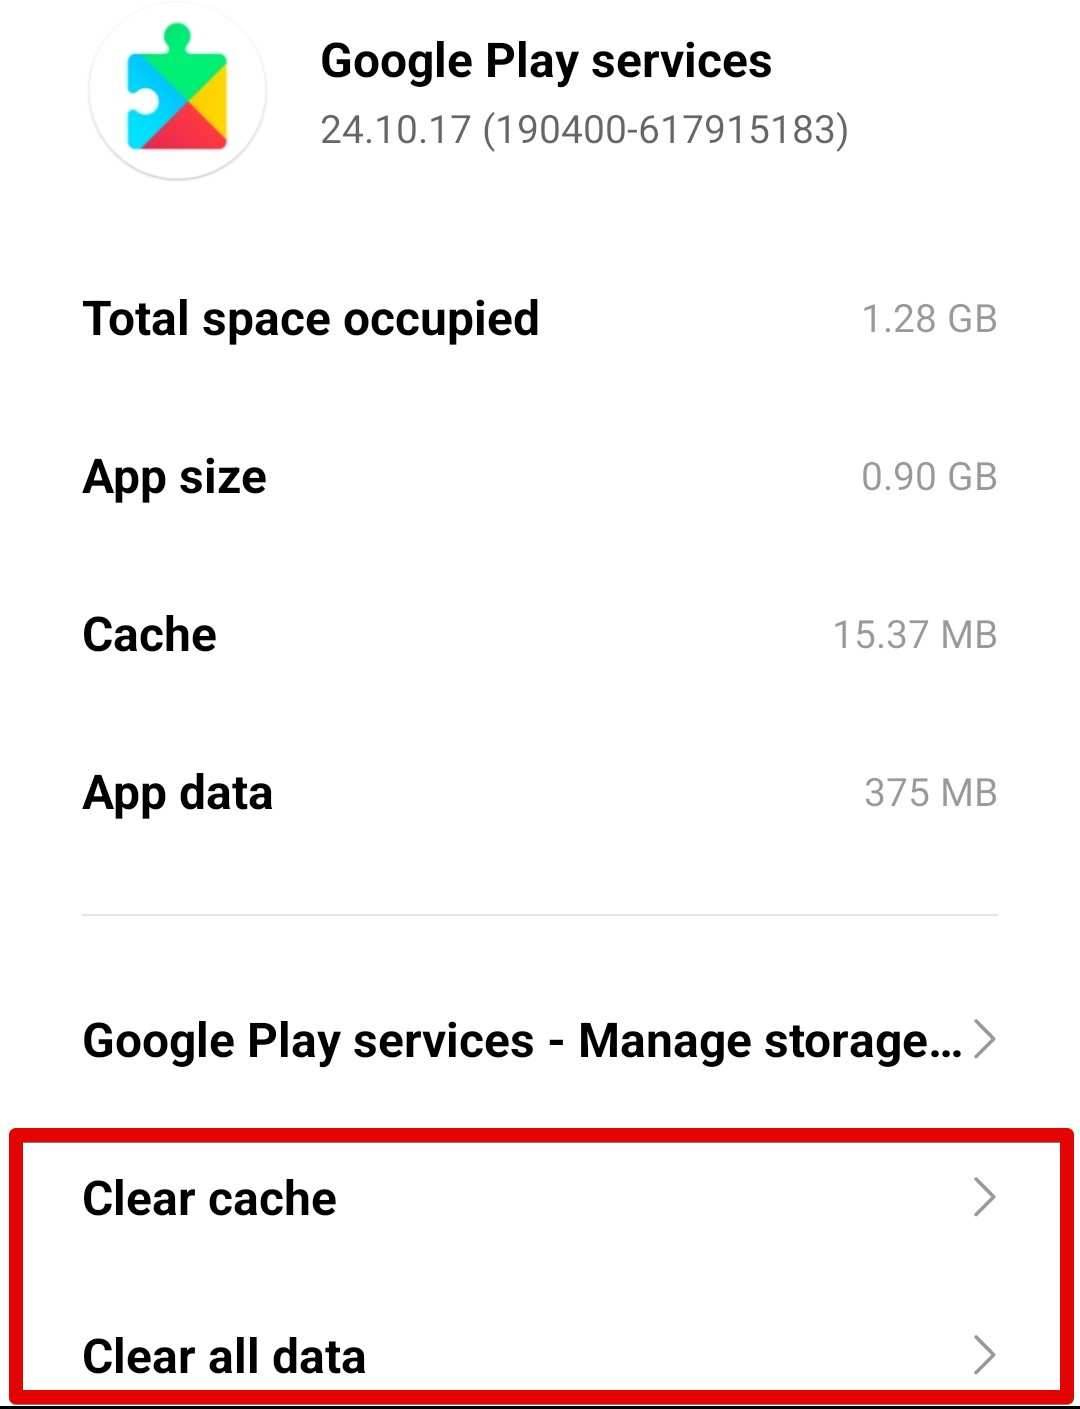
- To access its settings, tap “Google Play Services” after scrolling down the list until you find it.
- Go to the Google Play Services settings and select “Storage.”
- Press “Clear Cache” to get rid of Google Play Services’ temporary files.
- After that, tap “Manage Space” and choose “Clear all Data.”
A confirmation message might show up alerting you to the possibility that deleting data will erase certain saved information and necessitate verifying payment methods and Google Account login credentials across all devices. If this is acceptable to you, hit “OK” or “Clear.”
Conclusion
Gmail Requires One Or More Google Play Services is an error that does not have any concrete solution. The problem is within the server of Google Play services or Android. We suggest you wait for the fix from the developers. On the other hand, this issue can also occur by the user by mistake. So you can implement all the methods mentioned above to fix such issue and improve your Gmail experience.