The purchases safety stands for one of the main requirements of the customers.
Any Internet shop should be built on an e-commerce secured platform. When we mention reliable and secured platforms we are sure to bear in mind Magento.

Though, to make your store secure you should hire a reliable Magento development company. If you want to do it by yourself, it is necessary to follow some recommendations.
One of such recommendations is the usage of reCAPTCHA. Recently Magento development company developers announced about adding reCAPTCHA and 2FA functionality to all “Magento 2.1.” versions.
This review tell you in the options to settle reCAPTCHA in Magento 2, such as:
· Settling reCAPTCHA in Magento 2
· Generation of Google reCAPTCHA keys
· Configuration of Magento 2 reCAPTCHA
Settling reCAPTCHA in Magento 2
Launch SSH-terminal, connect Magento 2 store and go to root catalog.
Next, be sure to launch the following command:
composer require msp/recaptcha:2.0.0
Next, check the request of the repository account, user name, and password, which you can get in your account.
In case you get the error message ‘proc_open(): fork failed – Cannot allocate memory’ in phar, you can allow it having connected Swap space or via the following command:
php -d memory_limit=-1 /usr/local/bin/composer require msp/recaptcha:2.0.0
As soon as it is done connect the module via the following command:
php bin/magento module:enable –all
Next, refresh setting via the following command:
php bin/magento setup:upgrade
Next, be sure to clear cache:
php bin/magento cache:clean
php bin/magento cache:flush
Google reCAPTCHA keys generation
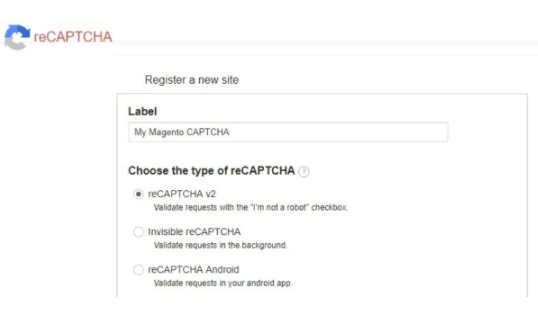
Browse Google reCAPTCHA website and make sure that you have entered your account data.
Next enter the key mark. In our case it is My Magento CAPTCHA, you can add your option. Next, be sure to select reCAPTCHA type. There are three types available, check the following two of them:
reCAPTCHA v2: verifies requests in one click of the button.
Invisible reCAPTCHA: verifies requests in the background mode without any interaction.
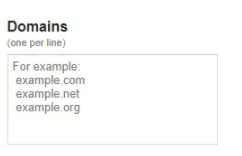
After selection CAPTCHA type, be sure to enter Magento domain and subdomains to which you want to add reCAPTCHA:
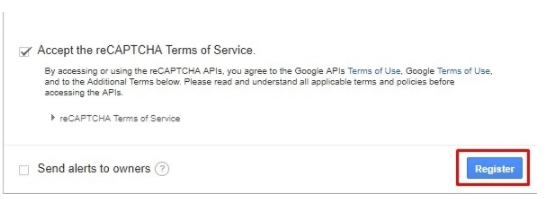
Next, mark the appropriate box having accepted reCAPTCHA Terms and Conditions and press registration button:
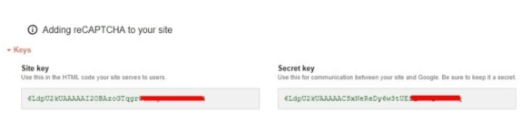
Next browse to a new page. Now browse from “Add reCAPTCHA” section to the section of your web site, and verify reCAPTCHA keys generation. Copy Site Key and Secret Key, which you will use in next step.
Magento 2 reCAPTCHA configuration
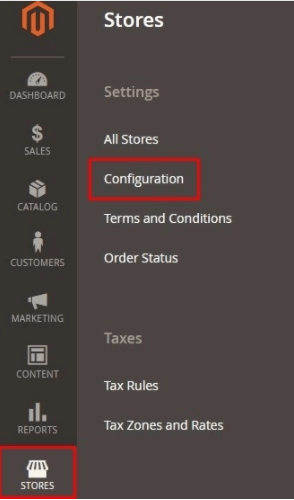
Enter your shop admin panel and browse STORES → Configuration section:
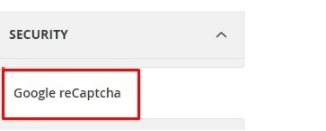
Now press Google reCaptcha in the Security tab:
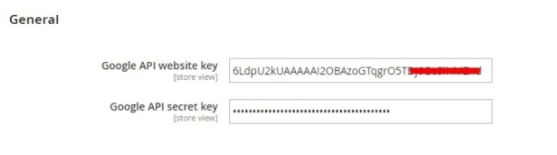
First, open «General» section, enter Google reCaptcha keys which you have copied during the last step. Site Key in Google API website key and Secret Key in Google API secret key:
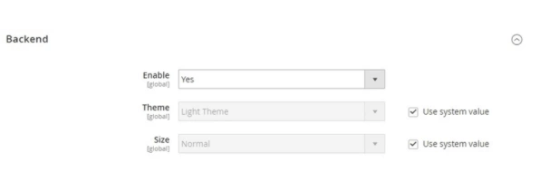
Deploy backend part in case you want to connect reCAPTCHA Google to admin username and password, be sure to select “Yes” from the drop-down list «Enable»:
Now let’s open the last section, frontend. Select «Yes» from the drop-down list «Enable», and next settle Google reCaptcha for your external forms depending on your needs:

Next, simply press Save Config.

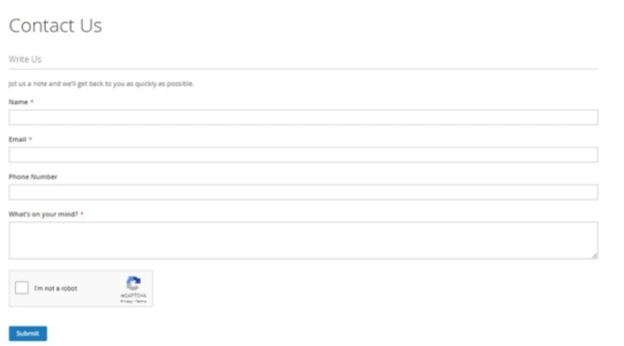
Now browse to the page of any form of your shop. In our case it is the” Contact us” section with the following result: